Template Setup
The application allows you to manage the field structure of your workflows. Workflows can be created using a prebuilt template or customized using the predefined SQL Module Field Types.
On This Page
Template Setup has two main areas that work together:
Define Fields - Create and configure the fields that make up your workflow template
- Add different field types (Free Text, Dropdown, Date, Tickler, etc.)
- Set field properties (required, searchable, length, etc.)
- Organize fields using tabs and subtabs
- Configure special fields like notifications and recurring entries
Define Headers - Control how fields appear in listings and notifications
- Set which fields show in record listings
- Configure fields for email notifications
- Customize Pending Actions and Pending Signatures displays
- Override default notification fields for Date and Tickler fields
First, use Define Fields to build your template structure. Then, use Define Headers to control how that data displays throughout the system.
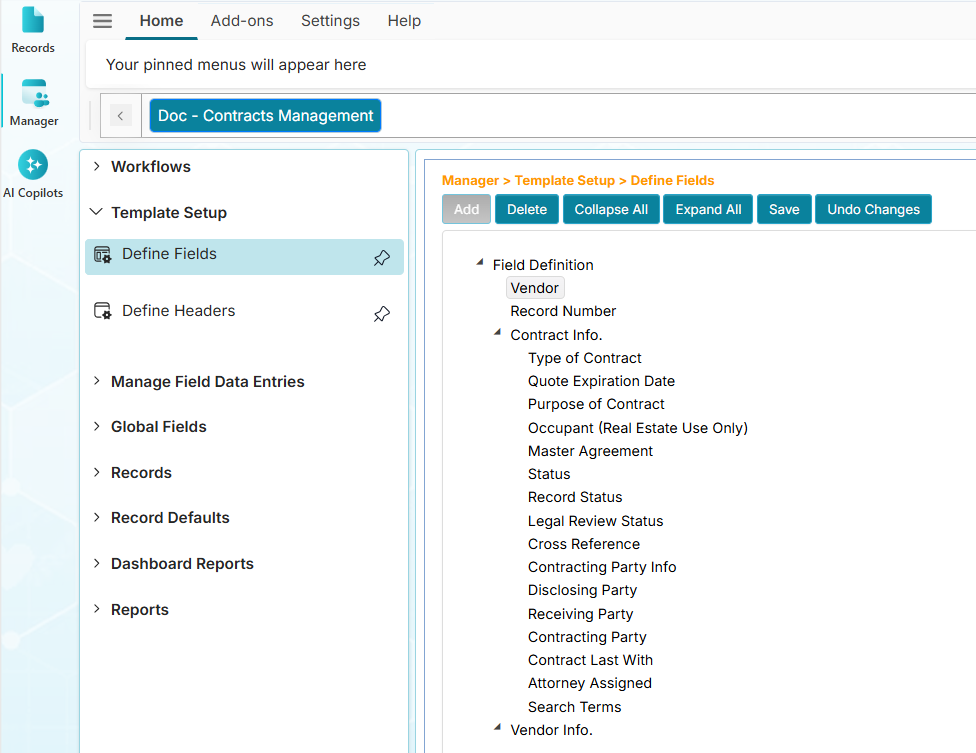
Define Fields
The Define Fields menu allows you to manage your workflow template using the different field types (25+) to meet your data management needs.
| Field Type | Description |
|---|---|
| Archive | Indicates if a record is active or archived. Archived records do not trigger notifications. |
| AutoNumber | Automatically generates a unique record identifier using customizable formats that can include sequential numbers, dates, and static text (e.g., INV-2024-001). See Auto Number Fields for how to configure the format. |
| Bit (On/Off, Yes/No) | Stores a true or false value via radio buttons. |
| Checkbox | Stores a true or false value via a checkbox. |
| Create DateTime | Records the date and time when the record was created. |
| Create User | Stores the user who created the record. |
| Date | Stores a date. When "Notify" is enabled, it displays a box to send email in advance before the date and an email address. |
| Decimal | Stores numbers with decimals. |
| DropDown Box | Stores the selected value from a dropdown list. |
| DropDown Box/Back | Extended dropdown with additional subfields. |
| E-mail Address | Stores an e-mail address. |
| Free Text | Stores text including letters, numbers, and symbols. |
| Line | Acts as a visual separator grouping fields. |
| Map Address | Stores latitude and longitude for map display. |
| Money | Stores monetary values. |
| Number | Stores numeric values. |
| Print Label Tracking | Marks a record for printing in Label Reports via radio buttons. |
| Recurring Entries (Repeat) | Allows you to store a nested subgroup of records within a record. |
| Route Users | Stores the user who receives the initial route upon record creation. |
| Selection Box | Stores selected items from a checklist. |
| Selection Box/Back | Extended selection box with extra subfields. |
| Sub Tab | Container for a subgroup of fields. |
| System Users | Lists all active users in a dropdown. |
| Tab | Container for grouping fields. |
| Tickler | Stores a date tickler for recurring email notifications. Sends emails every set number of months until the date is cleared. |
| Update DateTime | Records the last update date and time. |
| Update User | Stores the user who last updated the record. |
| Global Fields | Selects a reusable dropdown field across workflows. |
Field Properties
A field can have different properties that affects how it displays or manage it values.
| Property | Description |
|---|---|
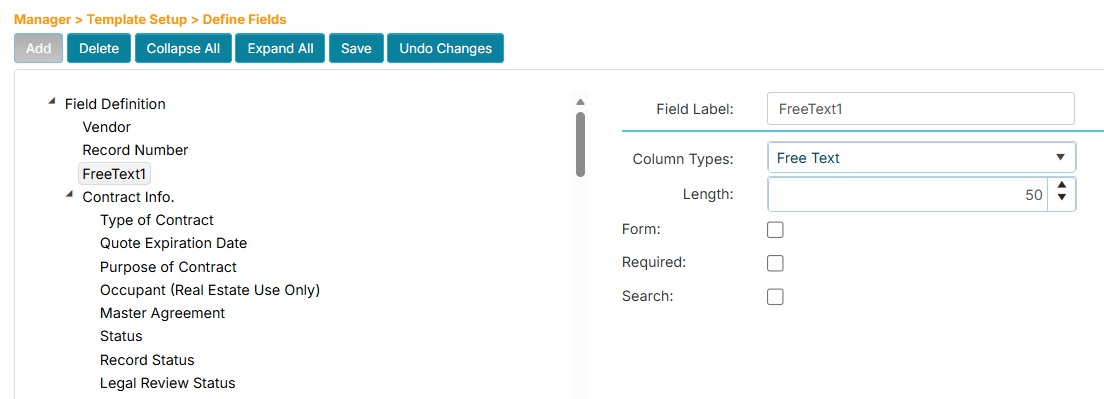
| Length | Sets character limit for Free Text fields. |
| Form | Displays Free Text field in a window. Best for long text input. |
| Notify | When checked, marks the date field for advanced email notifications. |
| Required | Makes the field mandatory. |
| Lock | Prevents non-managers from adding dropdown items. |
| Search | Includes the field in search operations. |
| Search Type | Makes the dropdown field appear in expanded search; active only if Search is enabled. |
| Yes/On Label | Custom label for true (Bit field). |
| No/Off Label | Custom label for false (Bit field). |
| Checkbox Text | Custom label for Checkbox field. |
Display Order of Fields
Fields can be organized in a form using the following order.
-
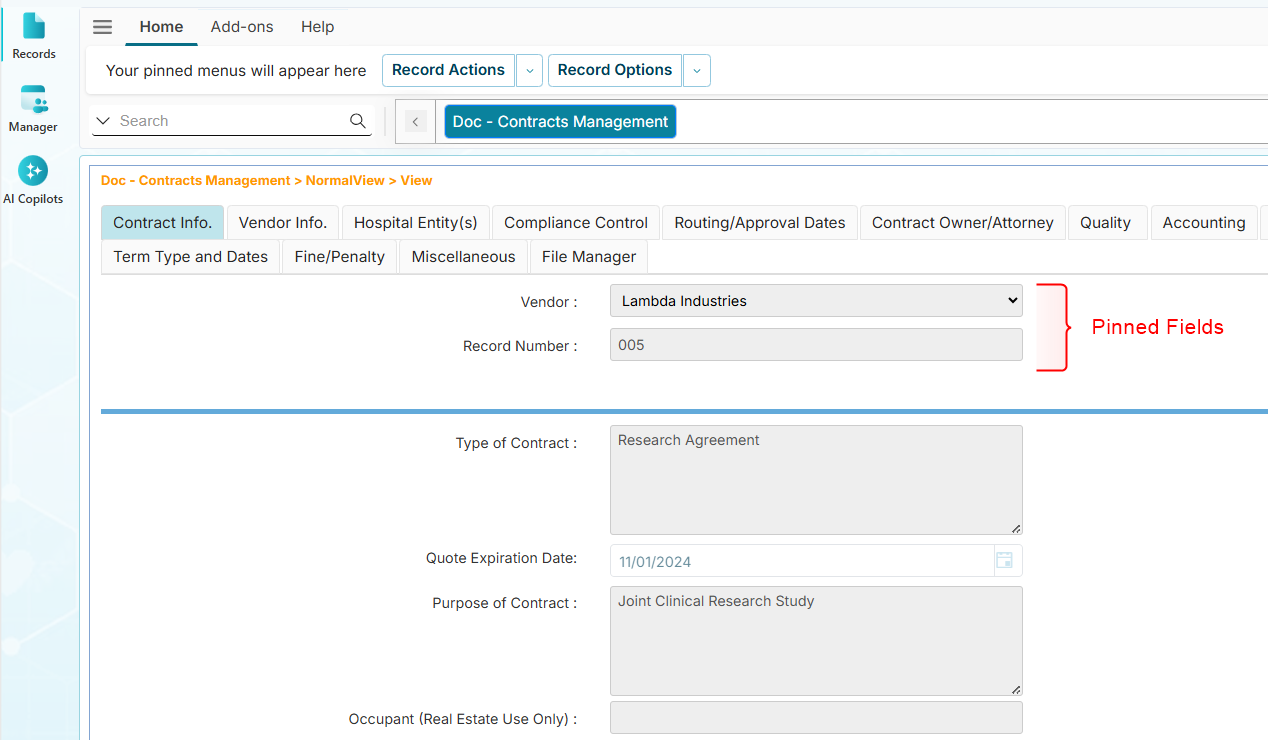
Pinned Fields: These fields are always visible at the top of every tab, regardless of which tab is active.
-
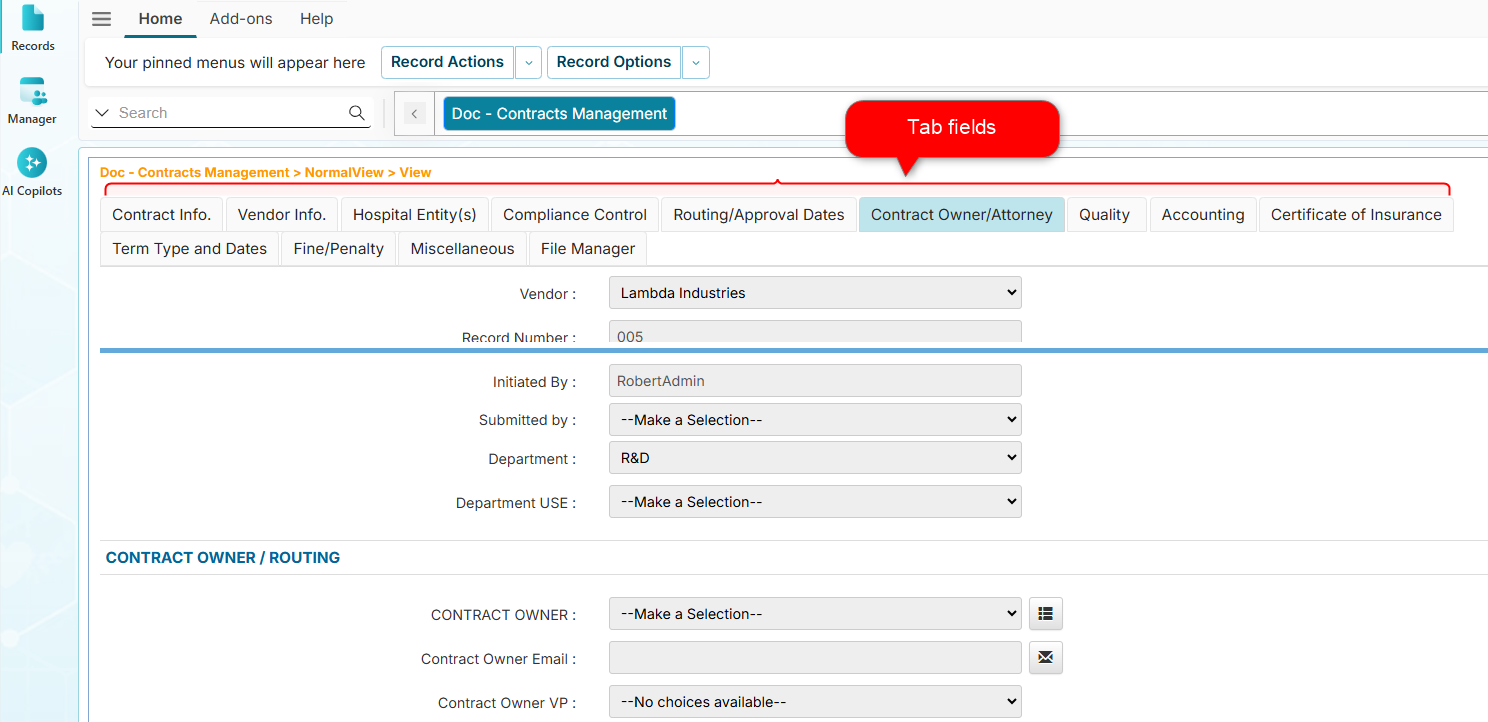
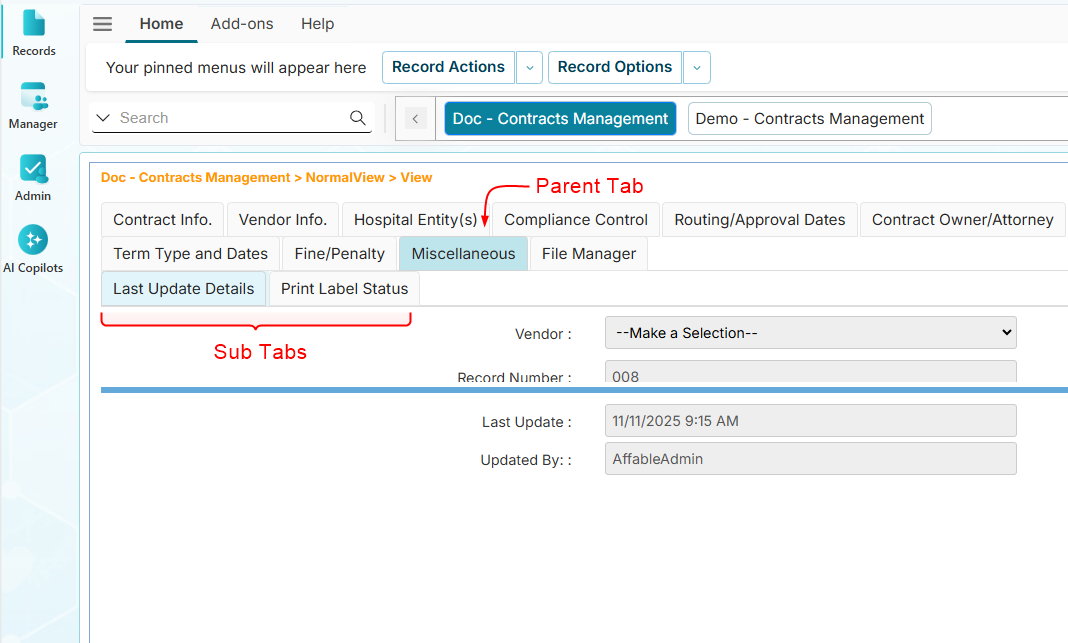
Tab Fields: These group fields inside a tab.
-
Sub Tab Fields: These create subgroups of fields inside a tab.
-
Background Fields: These fields contain nested or expandable content, such as:
- Fields with subfields (e.g., Dropdown Box/Back, Selection Box/Back)
- Fields with subrecords (e.g., Recurring Entries)
These fields allow you to organize additional related data within a parent field.

-
File Manager: This is a default tab placed at the end of all tabs after a record has been created. For more information, see File Manager.
Quick Start: Every guide below starts from Template Setup → Define Fields → [Your Workflow]
Already there? Jump straight to the section you need.
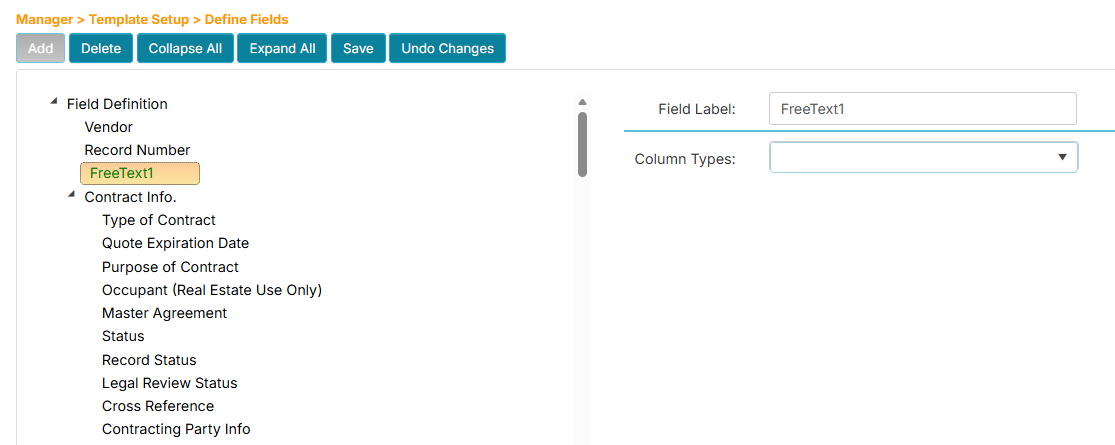
How to Add Pinned Fields
-
Click Template Setup, then click Define Fields.
-
From the Workflows listing, find and click your assigned workflow.
-
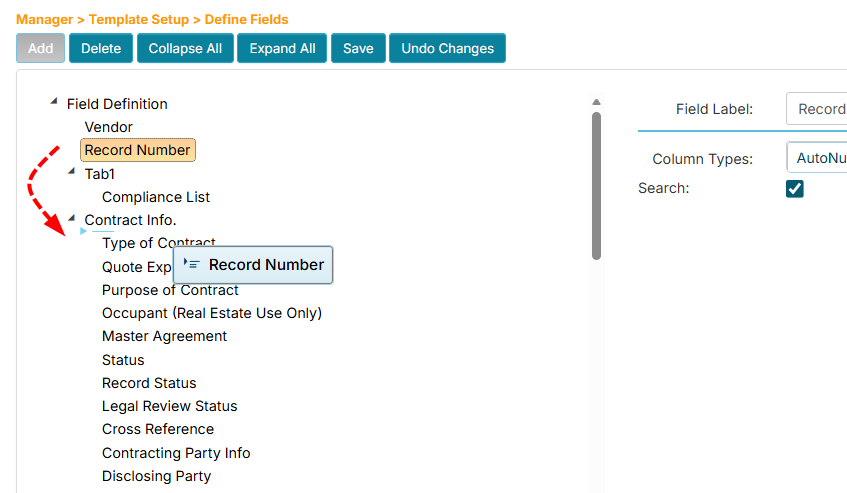
On the Define Fields page, click the Field Definition root node.
-
Click the Add button. A new field placeholder will be created below the Field Definition.
-
In the Field Label box on the right side, enter the name for the new field.
-
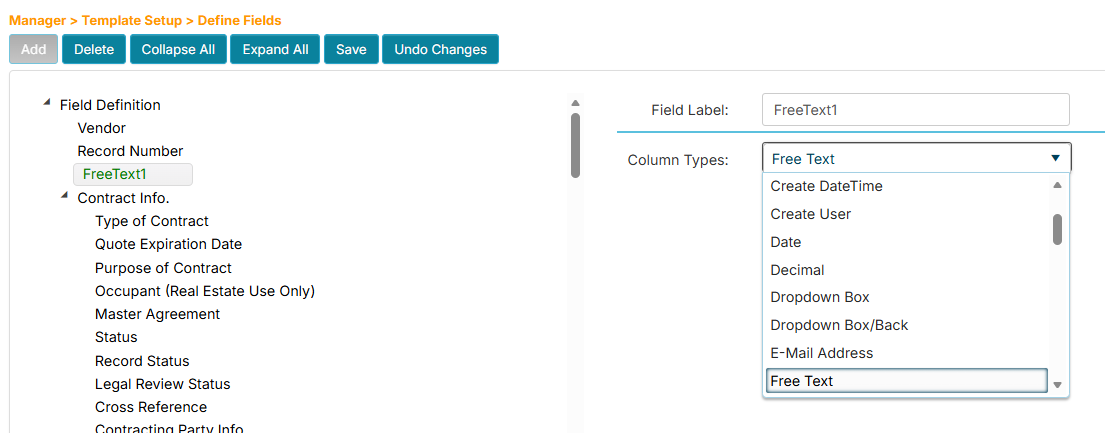
In the Column Type dropdown below, choose the field type (e.g., FreeText).
-
In the Length box, enter the maximum number of characters to store for this field (e.g., 50).
-
Click the Save button.
-
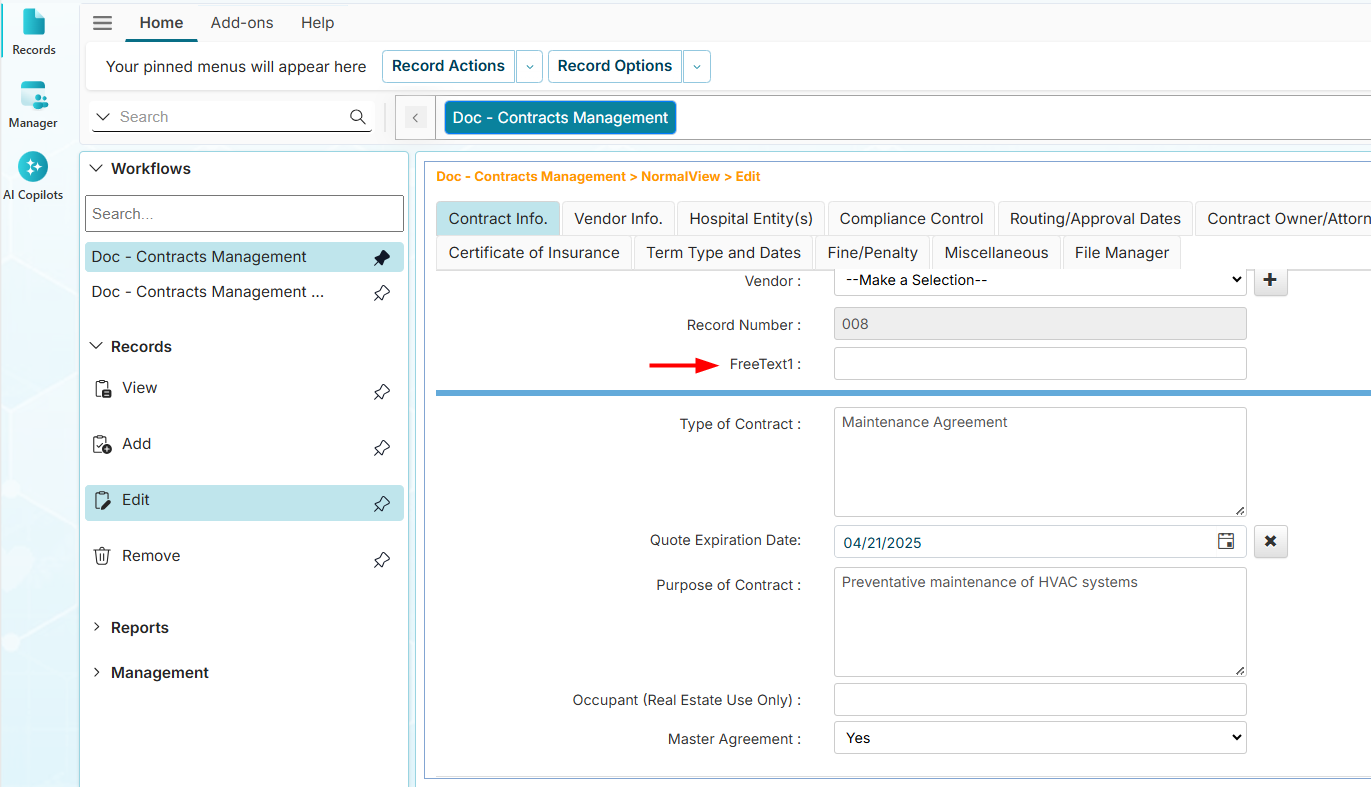
Navigate to any record in the workflow to see the new pinned field.
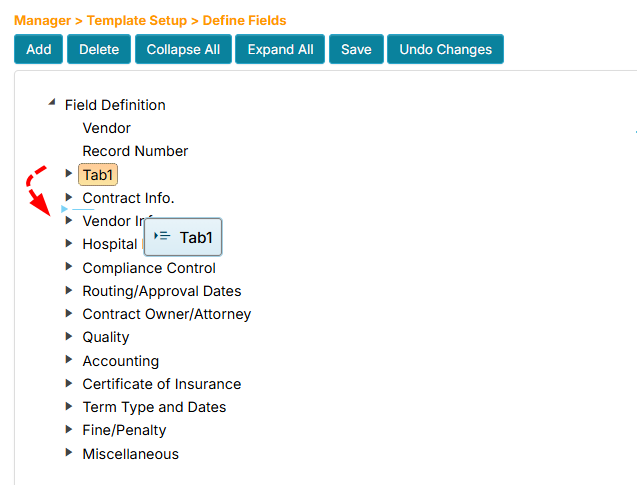
How to Add Tab Fields
-
Click Template Setup, then click Define Fields.
-
From the Workflows listing, find and click your assigned workflow.
-
On the Define Fields page, click the Field Definition root node.
-
Click the Add button. A new field placeholder will be created below the Field Definition.
-
In the Field Label box on the right side, enter the name for the new tab field.
-
In the Column Type dropdown below, choose the Tab field type.
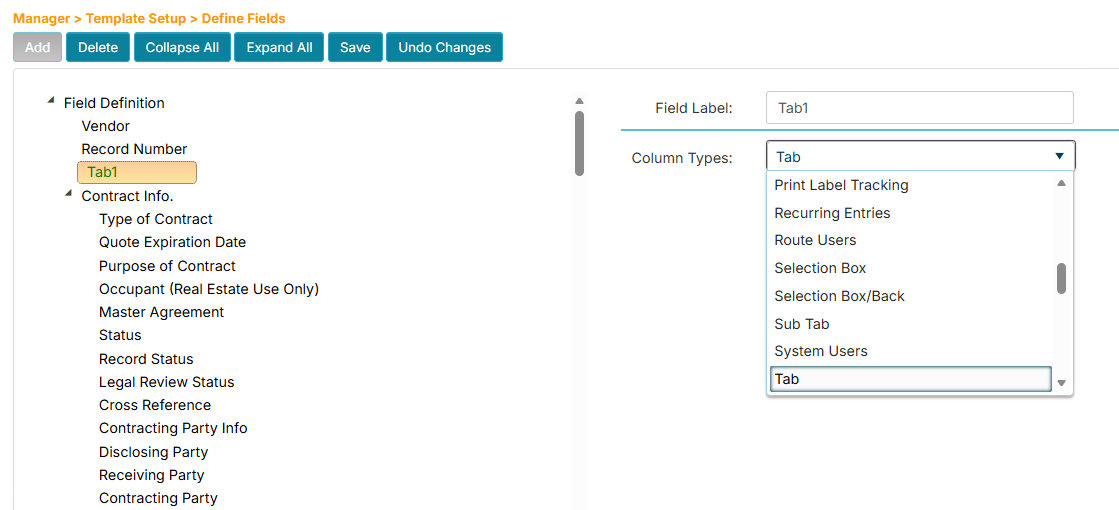
-
Click the Save button.
- The Tab field is used to organize or group related fields together.
- You can add subtabs that contain its own subgroup of fields.
- You can add Recurring type fields to manage subgroups of records inside a tab.
- You can drag and drop fields from other tabs to reposition them.
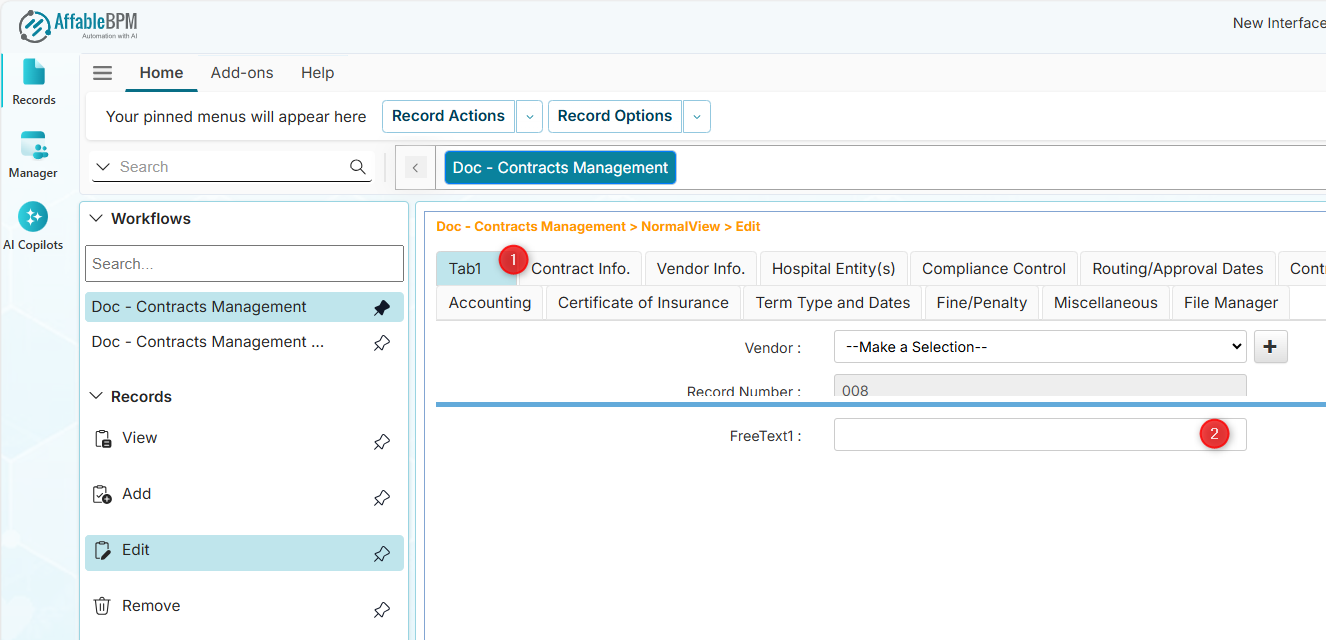
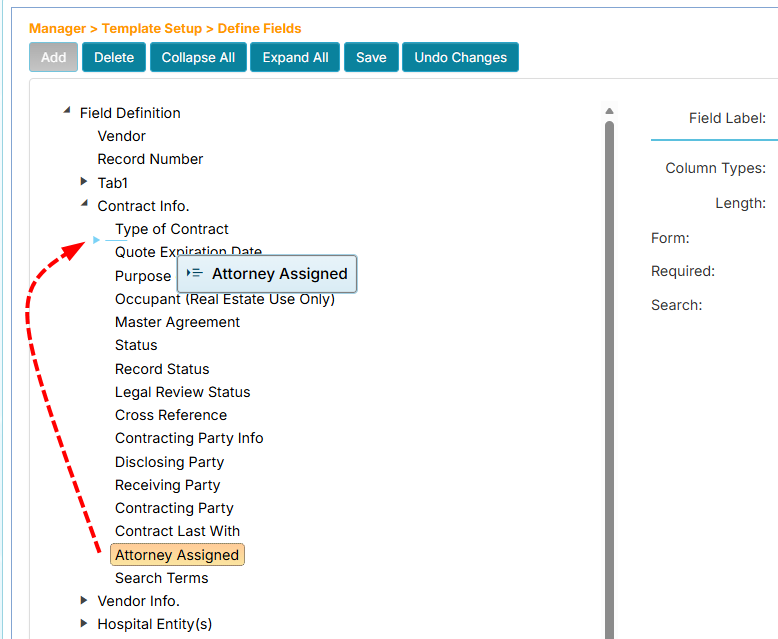
How to Add a Field Inside a Tab
-
Click Template Setup, then click Define Fields.
-
From the Workflows listing, find and click your assigned workflow.
-
On the Define Fields page, click the tab where you wish to add a field.
-
Click the Add button. A new field placeholder will be created below the tab.
-
In the Field Label box on the right side, enter the name for the new field.
-
In the Column Type dropdown below, choose the field type.

-
Click the Save button.
-
Navigate to any record in the workflow to see the new field.
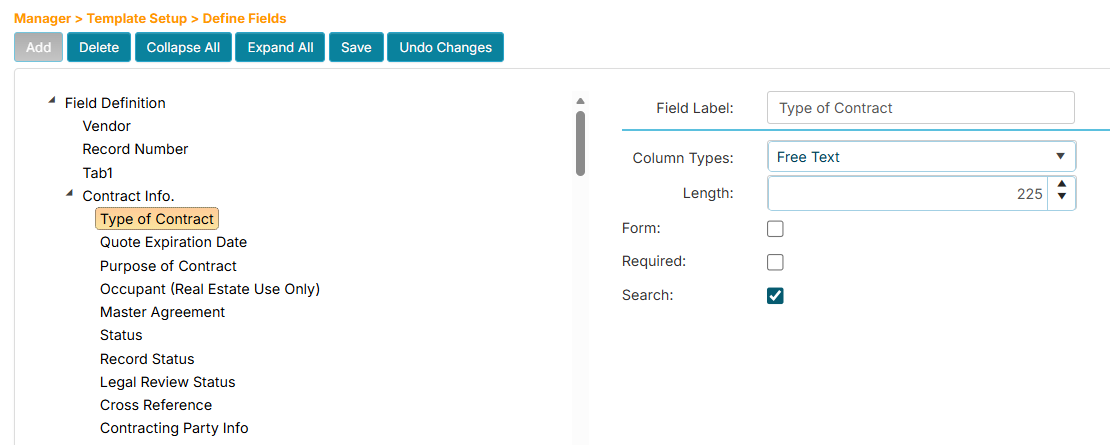
How to Edit a Field
Ensure that editing a field is properly communicated to your team, as it may affect reports, integrations, or workflows that reference the field. Team members may be confused if the field's original form has changed (e.g., for Free Text type, if the maximum character length has been reduced or the field has been changed to required).
-
Click Template Setup, then click Define Fields.
-
From the Workflows listing, find and click your assigned workflow.
-
On the Define Fields page, click the field. It will display the properties that you can change on the right side.
-
Modify the options as needed. For a Free Text field, you can change the label, length, form display appearance, required status, and search inclusion in the record listing.
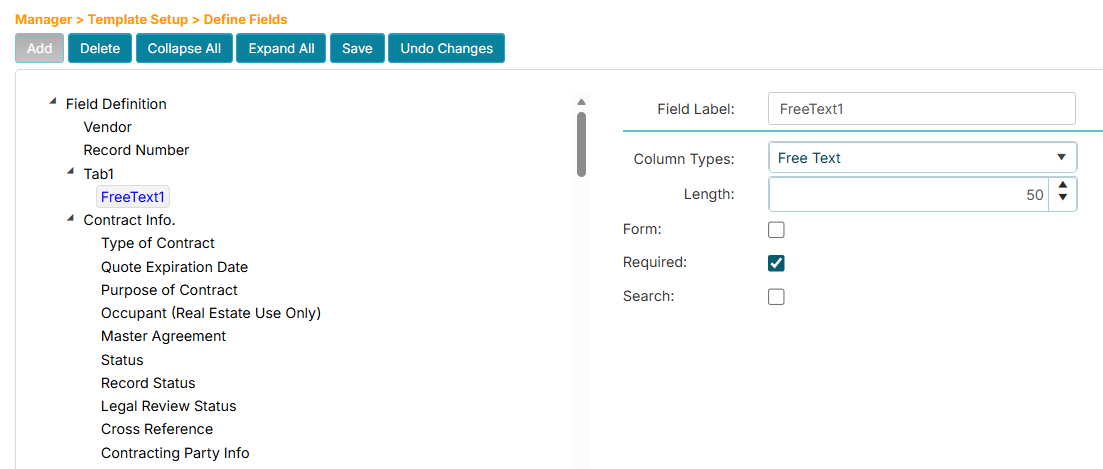 tip
tipThe field will display in blue text when the application detects a change.
-
Click the Save button.
How to Delete a Field
Deleting a field is permanent and will delete all of its data. Ensure that the field is no longer needed and that its removal is properly communicated to your team, as it may affect reports, integrations, or workflows that reference the field.
-
Click Template Setup, then click Define Fields.
-
From the Workflows listing, find and click your assigned workflow.
-
On the Define Fields page, click the field.
-
Click the Delete button to mark it for deletion.
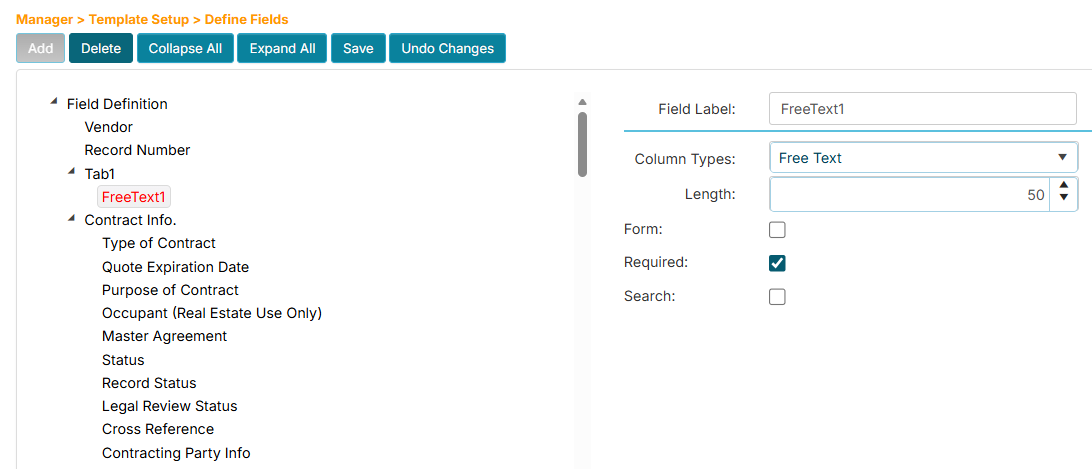 tip
tipThe field will display in red text when it is marked for deletion.
-
Click the Save button.
How to Make a Field Searchable
-
Click Template Setup, then click Define Fields.
-
From the Workflows listing, find and click your assigned workflow.
-
On the Define Fields page, click the field you wish to make searchable. Its properties will display on the right side.
-
Click the Search checkbox to enable indexing of the field for the record listing search.
-
Click the Save button.
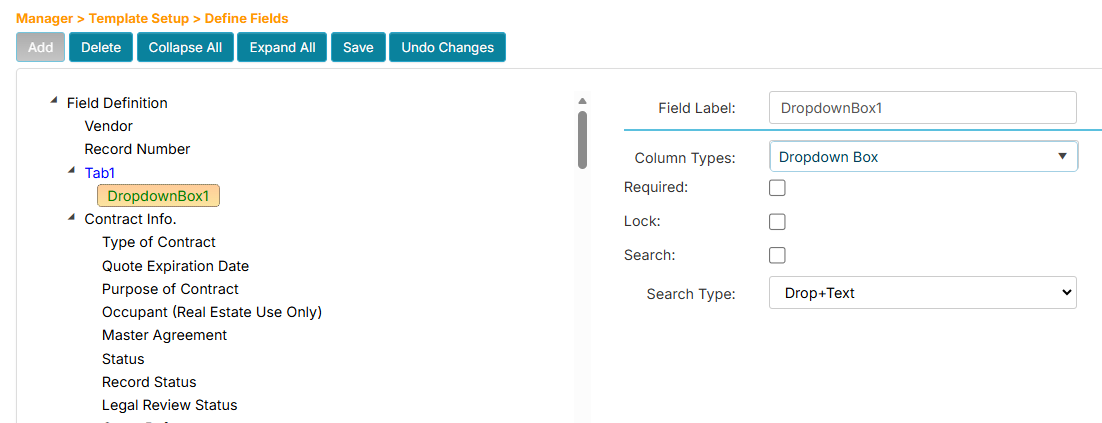
How to Add a Dropdown Field
-
Click Template Setup, then click Define Fields.
-
From the Workflows listing, find and click your assigned workflow.
-
On the Define Fields page, click the tab where you want to add the field.
-
Click the Add button. A new field placeholder will be created below the tab.
-
In the Field Label box on the right side, enter the name for the new dropdown field.
-
In the Column Type dropdown below, choose Dropdown Box.
-
Click the Save button.
-
Navigate to any record in the workflow to see the new dropdown field.
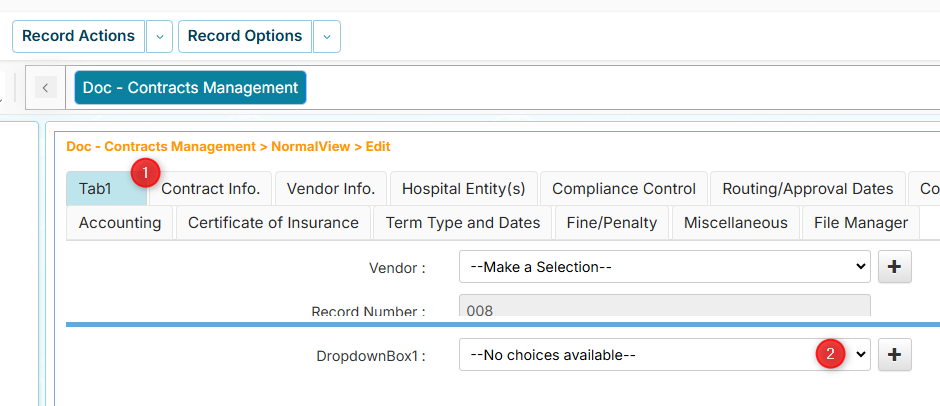
You can restrict users from adding dropdown items. See Dropdown Fields in the Workflow Settings.
How to Add a Date Field with Advance Notifications
-
Click Template Setup, then click Define Fields.
-
From the Workflows listing, find and click your assigned workflow.
-
On the Define Fields page, click the tab where you want to add the field.
-
Click the Add button. A new field placeholder will be created below the tab.
-
In the Field Label box on the right side, enter the name for the new Date field.
-
In the Column Type dropdown below, choose Date.
-
Check the Notify property.

-
Click the Save button.
-
Navigate to any record in the workflow to see the new date field.

The Date field with advance notifications consists of three parts:
- Month box - Number of months in advance before the date to send notification.
- Date box - The target date that also triggers a notification when reached.
- Email address box - The recipient who will receive the notifications.
Click the 'X' button to clear all three values (month, date, and email).
Notifications will not trigger if any value is missing.
To fully stop them, all three fields must be blank.
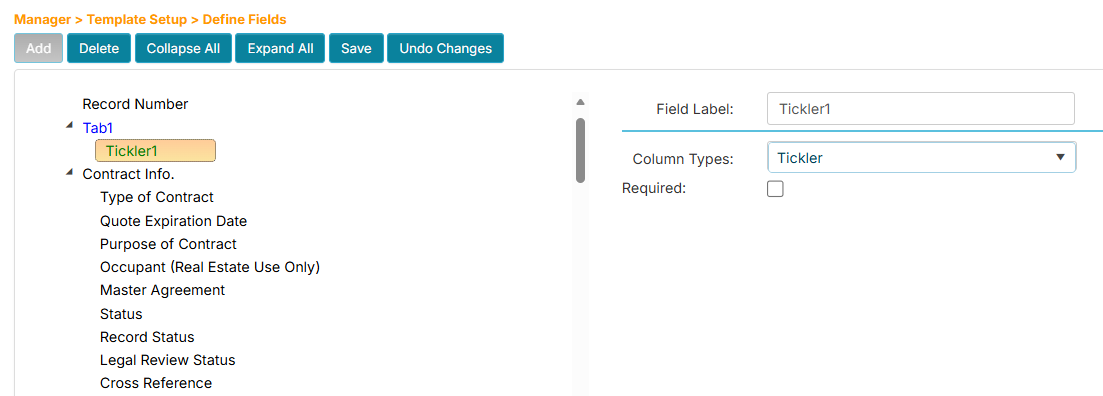
How to Add a Tickler Field with Follow-up Notifications
Tickler fields are useful for compliance monitoring and post-date obligations, such as checking if contract parties are meeting their commitments after a contract date.
-
Click Template Setup, then click Define Fields.
-
From the Workflows listing, find and click your assigned workflow.
-
On the Define Fields page, click the tab where you want to add the field.
-
Click the Add button. A new field placeholder will be created below the tab.
-
In the Field Label box on the right side, enter the name for the new Tickler field.
-
In the Column Type dropdown below, choose Tickler.
-
Click the Save button.
-
Navigate to any record in the workflow to see the new tickler field.

The Tickler field with follow-up notifications consists of three parts:
- Month box - Number of months after the date to send notification.
- Date box - The target date that also triggers a notification when reached.
- Email address box - The recipient who will receive the notifications.
Example use case: For a contract signed on January 1st with a 3-month tickler, the contract manager receives notifications on January 1st and April 1st to verify both parties are meeting their obligations.
Click the 'X' button to clear all three values (month, date, and email).
Notifications will not trigger if any value is missing.
To fully stop them, all three fields must be blank.
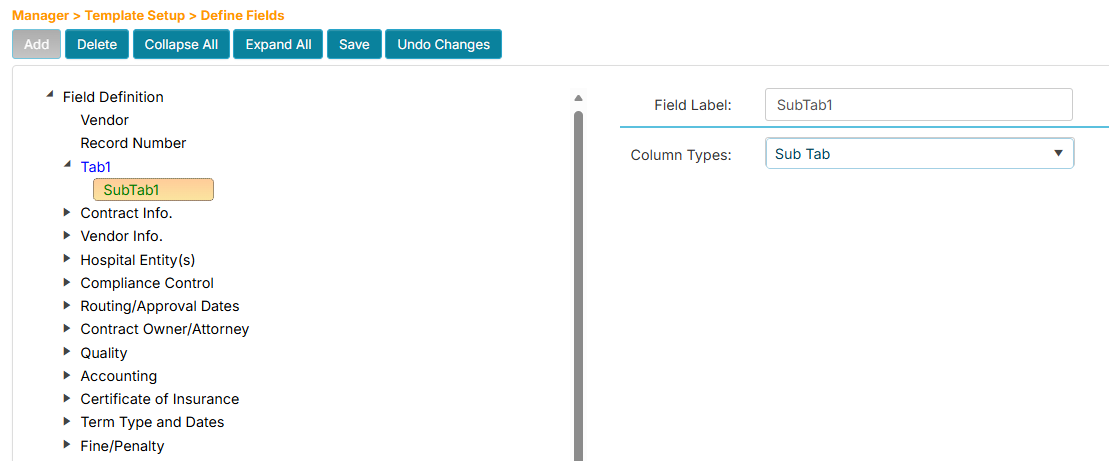
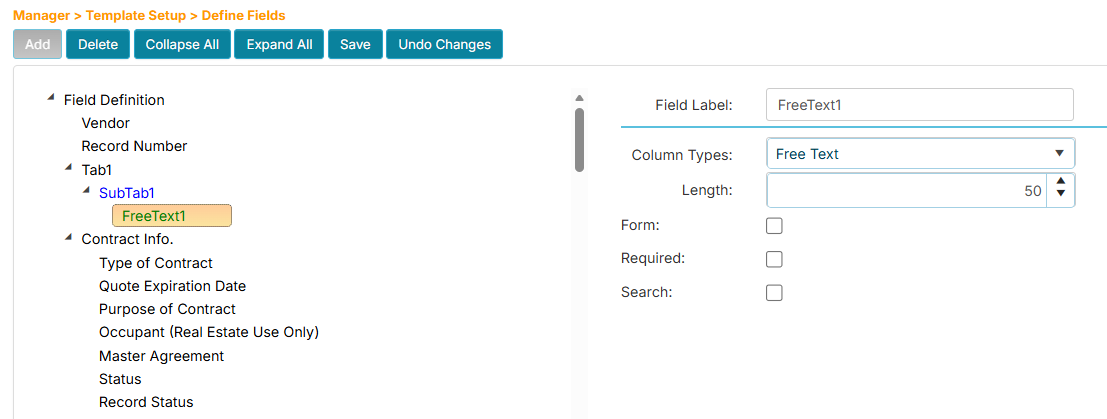
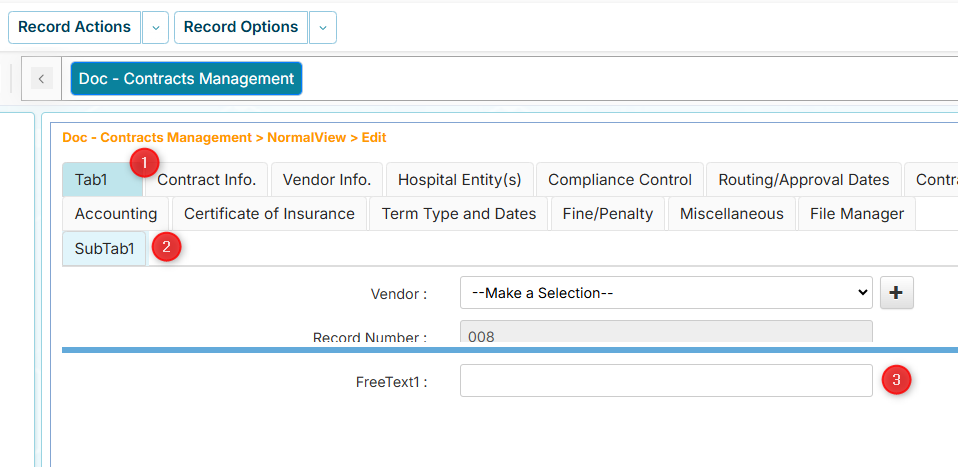
How to Add a Sub Tab Field
If you wish to group related fields inside a tab, you can add a Sub Tab field.
-
Click Template Setup, then click Define Fields.
-
From the Workflows listing, find and click your assigned workflow.
-
On the Define Fields page, click the tab where you want to add the Sub Tab field.
-
Click the Add button. A new field placeholder will be created below the tab.
-
In the Field Label box on the right side, enter the name for the new field.
-
In the Column Type dropdown below, choose Sub Tab.
-
Click the Save button.
-
A Sub Tab needs to have a subfield. Click the new Sub Tab field to add the subfield.
-
Click the Add button. A new field placeholder will be created below the Sub Tab field.
-
In the Field Label box on the right side, enter the name for the new subfield.
-
In the Column Type dropdown below, choose the field type (e.g., Free Text).
-
Check or fill the other field properties as needed.
-
Click the Save button.
-
Navigate to any record in the workflow to see the new Sub Tab and its subfield. The Sub Tab has a lighter background color than its parent tab.
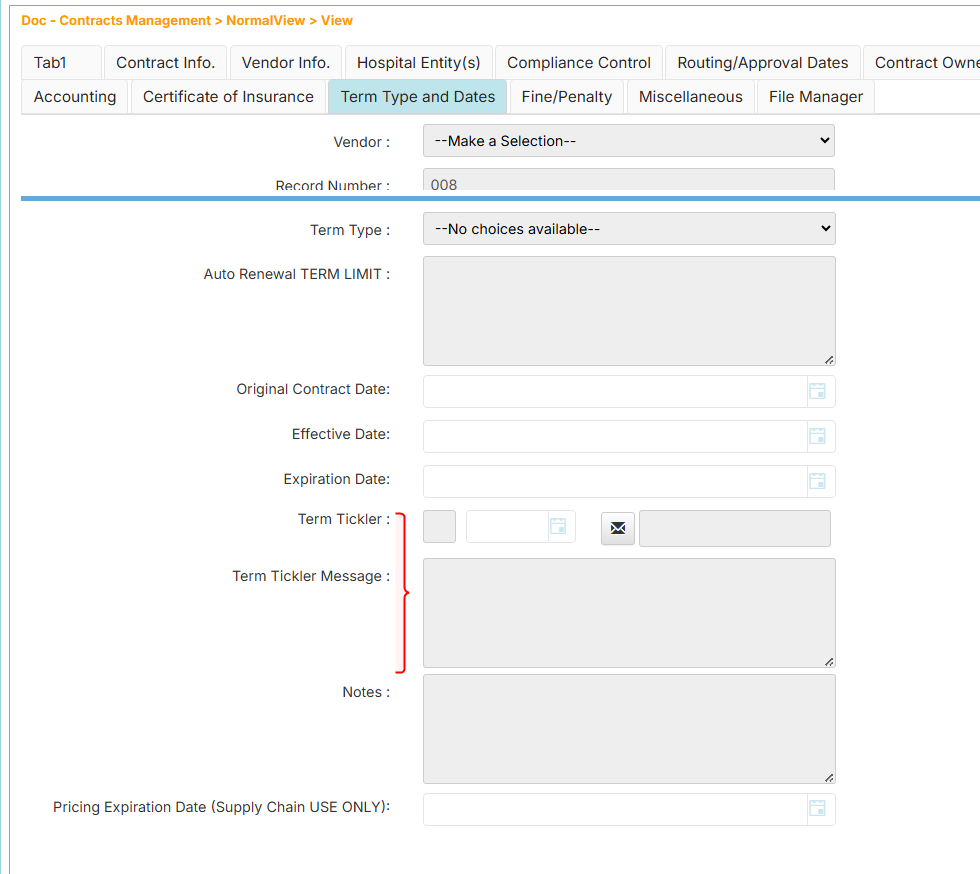
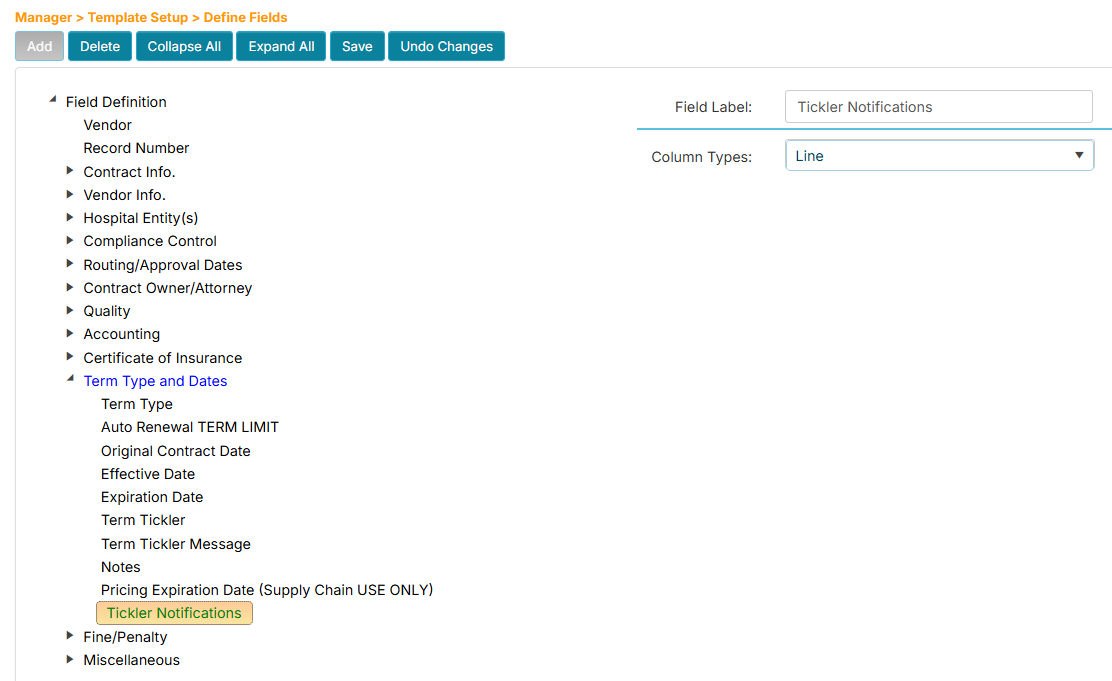
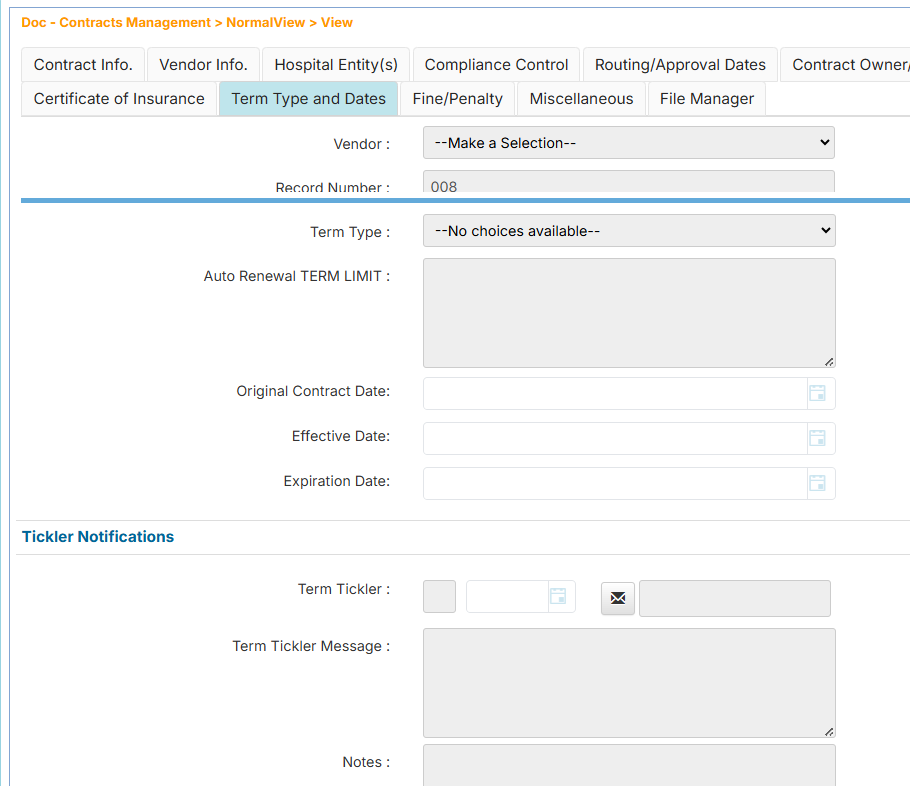
How to Create a Line Separator Between Fields
If you wish to have a visual separator between a group of fields, you can add a Line field. For example, this screenshot shows Term Tickler fields that can be grouped together by a Line field.
Here are the steps to do this:
-
Click Template Setup, then click Define Fields.
-
From the Workflows listing, find and click your assigned workflow.
-
On the Define Fields page, click the tab where you wish to add a field.
-
Click the Add button. A new field placeholder will be created below the tab.
-
In the Field Label box on the right side, enter the name for the new Line field (e.g., Tickler Notifications)
-
In the Column Type dropdown below, choose Line.
-
Drag the new Line field just above the field where you wish to separate the fields.
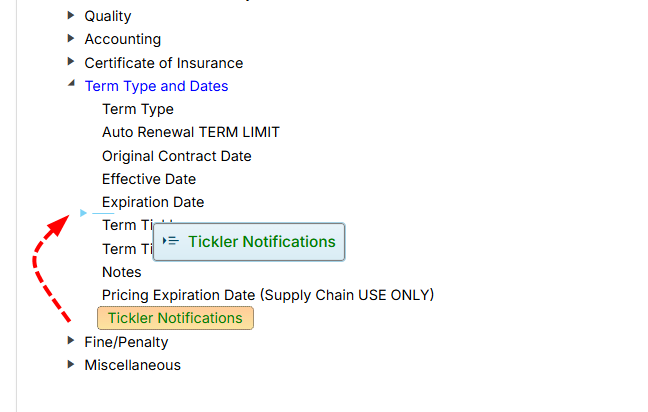
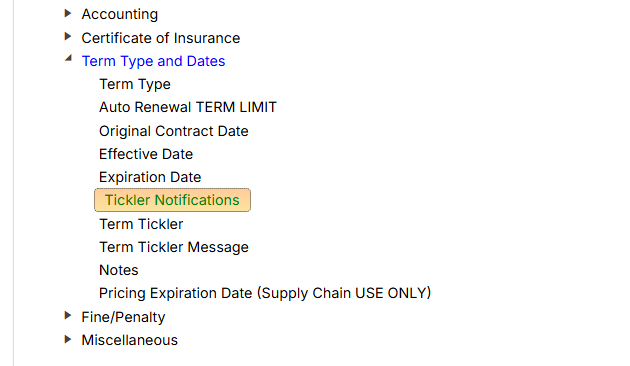
After dragging the Line field.
-
Click the Save button.
-
Navigate to any record in the workflow to see the new Line separator field.
How to Add a Dropdown with Background Fields
A Dropdown Box/Back field allows you to select an item from a list and view its associated details (such as contact information, specifications, or metadata). This helps maintain data consistency, reduces manual data entry, and keeps related information organized within your workflow. Here are the steps to add one:
- Click Template Setup, then click Define Fields.
- From the Workflows listing, find and click your assigned workflow.
- On the Define Fields page, click the tab where you wish to add a field.
- Click the Add button. A new field placeholder will be created below the tab.
- In the Field Label box on the right side, enter the name for the new field (e.g., Contract Owner).
- In the Column Type dropdown, choose Dropdown Box/Back.
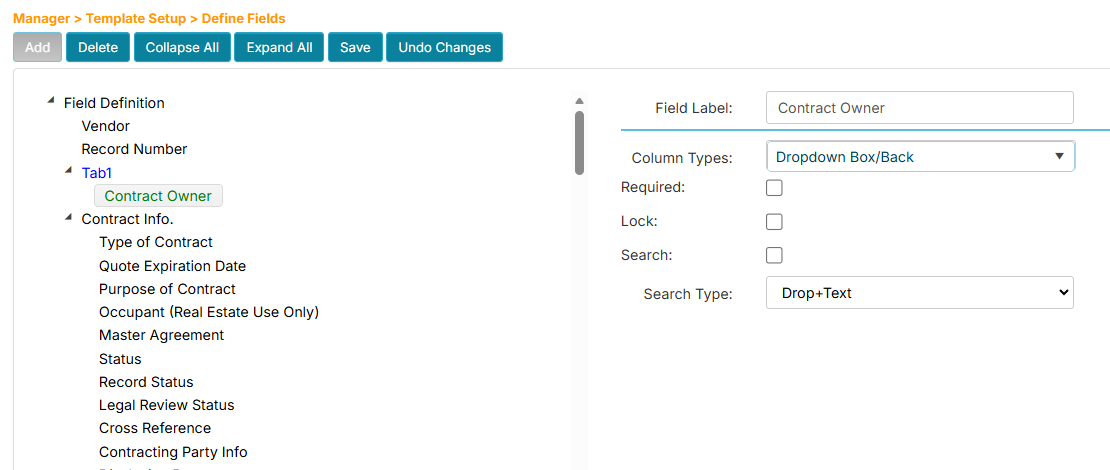
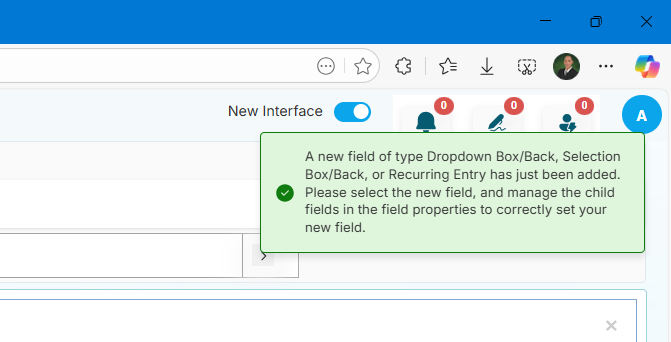
- Click the Save button. You will receive a message that says you need to add the child fields (subfields) to properly set up the Dropdown Box/Back field.
- Click the Manage Background Fields button. The page will update to help you add or manage its subfields.
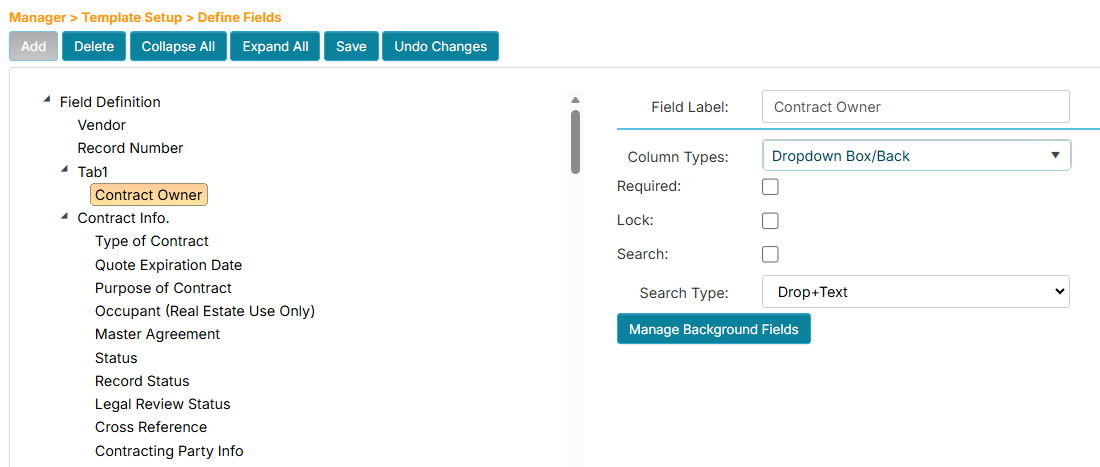
- Click the parent node (Contract Owner).
- Click the Add button. A new field placeholder will be created below.
- In the Field Label box on the right side, enter the name for the new subfield (e.g., Contract Owner Name).
- In the Column Type dropdown, choose the field type (e.g., Free Text).
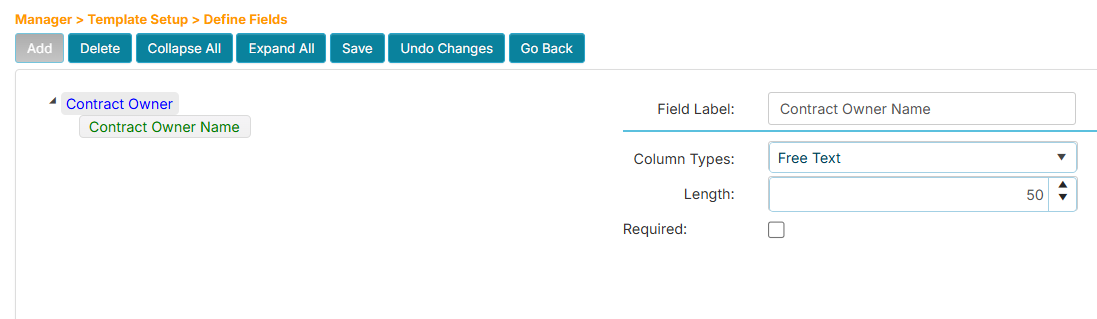
- Click the Save button.
- To add another subfield, click the parent node (Contract Owner).
- Click the Add button. A new field placeholder will be created below.
- In the Field Label box on the right side, enter the name for the new field (e.g., Contract Owner Email).
- In the Column Type dropdown, choose the field type (e.g., E-Mail Address).
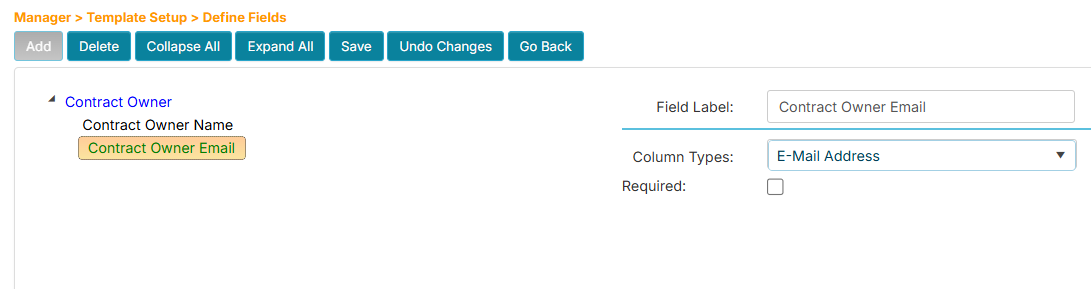
- Click the Save button.
- Click the Go Back button when done.
- Navigate to any record in the workflow to see the new Dropdown Box/Back field.
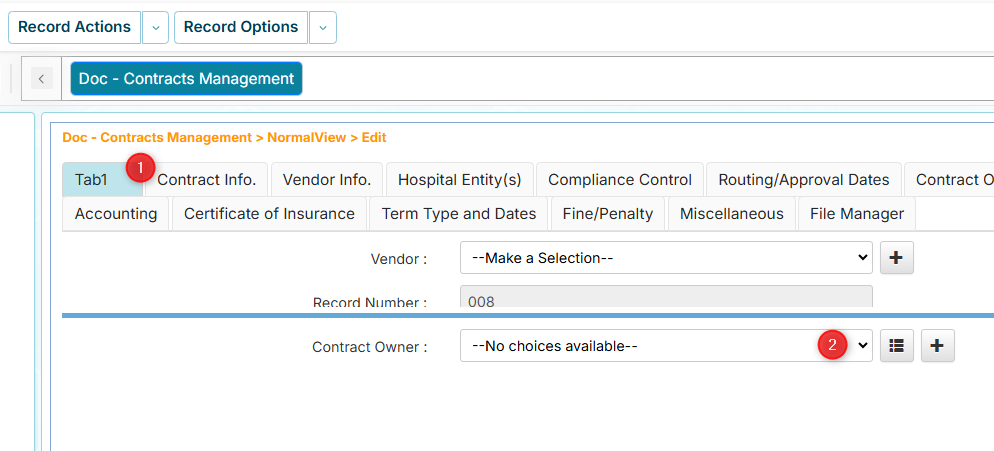
- The Dropdown Box/Back field has a View Entry button to help you see its nested subfields.
- You can click the Add [+] button to add new dropdown items.
- To manage or edit the list of dropdown items, you will need to use the Manage Field Data Entries menu, then choose the Multi Field option.
How to Add Multiple Entries Within a Record (Recurring Entries)
The Recurring Entries field lets you create multiple entries within a single record, where each entry has the same set of fields.
For example: In Compliance Management tracking of a contract, you might need to track dozens of different compliance controls. Instead of creating separate records for each control, Recurring Entries allow you to list all controls within one record. Each control entry captures:
- The compliance control name
- Responsible email contact
- Fine amount details
- Control specifications
This keeps related information together while maintaining structure and making it easy to add, edit, or remove individual entries as your compliance requirements change.
Adding a Recurring Entries Field
-
Click Template Setup, then click Define Fields.
-
From the Workflows listing, find and click your assigned workflow.
-
On the Define Fields page, click the tab where you wish to add a field.
-
Click the Add button. A new field placeholder will be created below the tab.
-
In the Field Label box on the right side, enter the name for the new field (e.g., Compliance List).
-
In the Column Type dropdown, choose Recurring Entries.
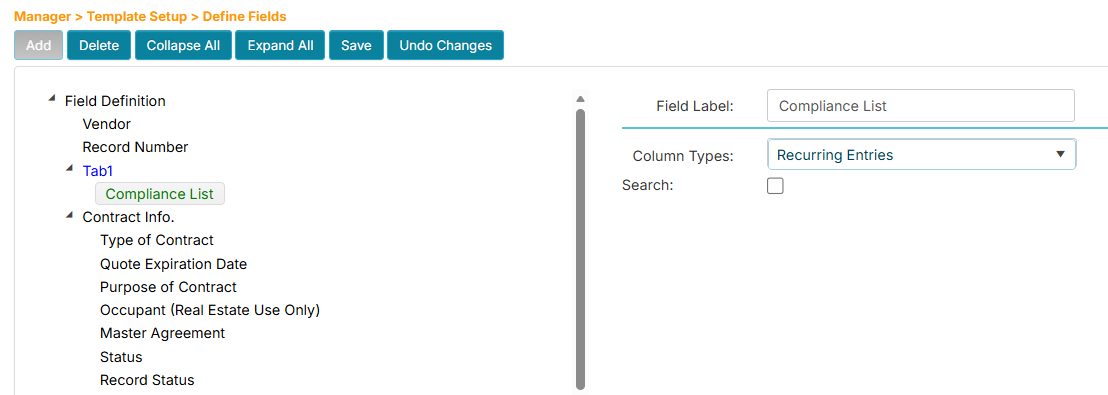
-
Click the Save button. You will receive a message that says you need to add the child fields (subfields) to properly set up the Recurring Entries field.
-
Click the Manage Background Fields button. The page will update to help you add or manage its subfields.
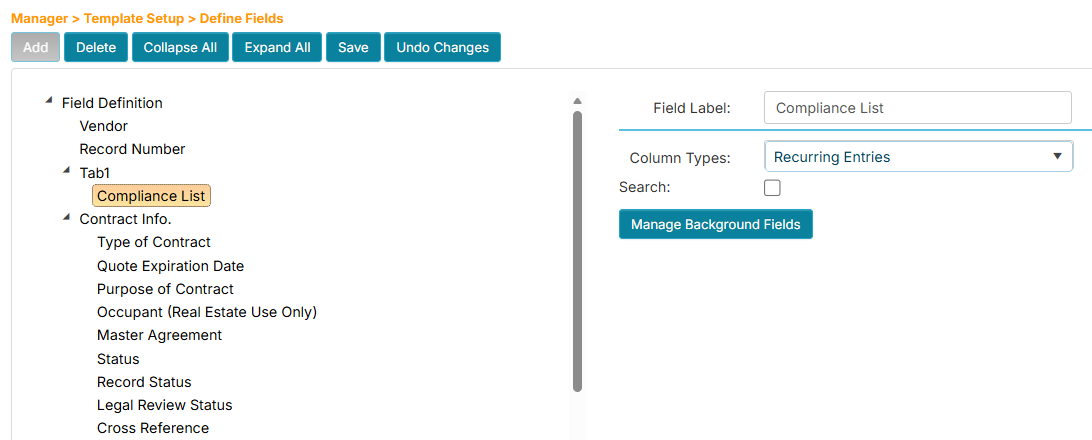
-
Click the parent node (Compliance List).
-
Click the Add button. A new field placeholder will be created below.
-
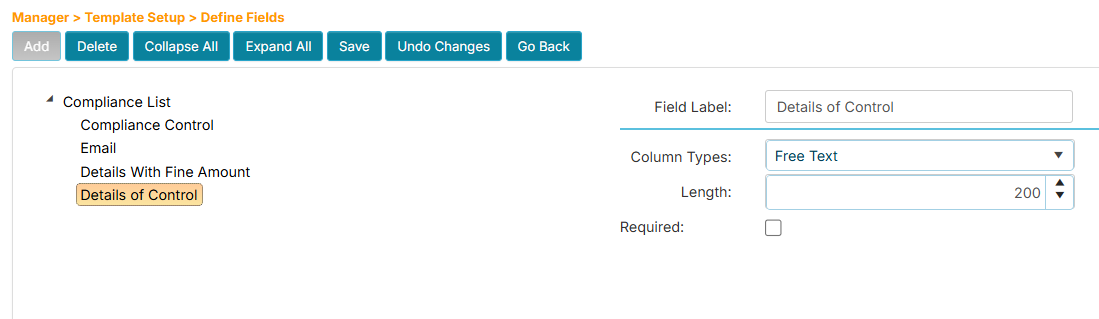
In the Field Label box on the right side, enter the name for the new subfield (e.g., Compliance Control).
-
In the Column Type dropdown, choose the field type (e.g., Free Text).
-
In the Length box, enter 100.
-
Click the Save button.
-
Click the parent node (Compliance List).
-
Repeat the steps for adding the remaining fields:
Field Name Type Length Compliance Control Free Text 100 Email E-Mail Address Details With Fine Amount Free Text 200 Details of Control Free Text 200 You should have the following subfields:
-
Click the Go Back button when done.
-
Navigate to any record in the workflow to see the new Recurring Entries field.
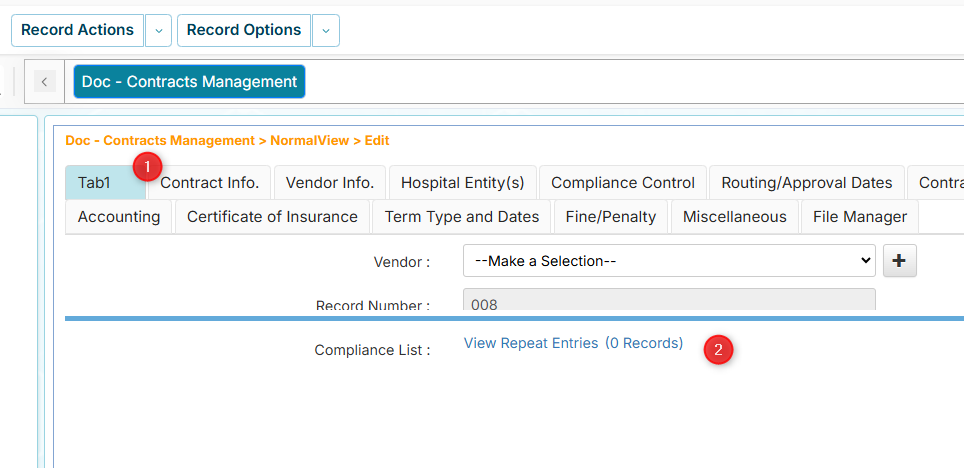
Adding an Entry to the Recurring Entries Field
-
Click the View Repeat Entries link. The Recurring Entries window will appear for new entries.
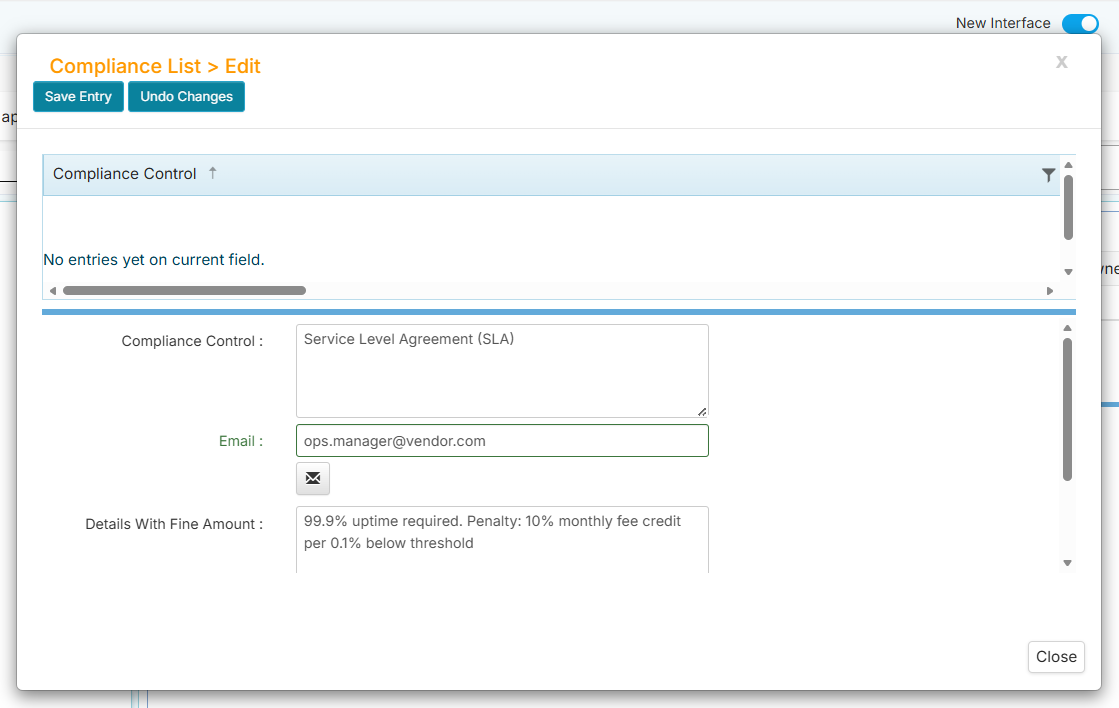
-
Enter the information for each field.
-
Click the Save Entry button when done.
-
Click the New Entry button if you wish to add more items.
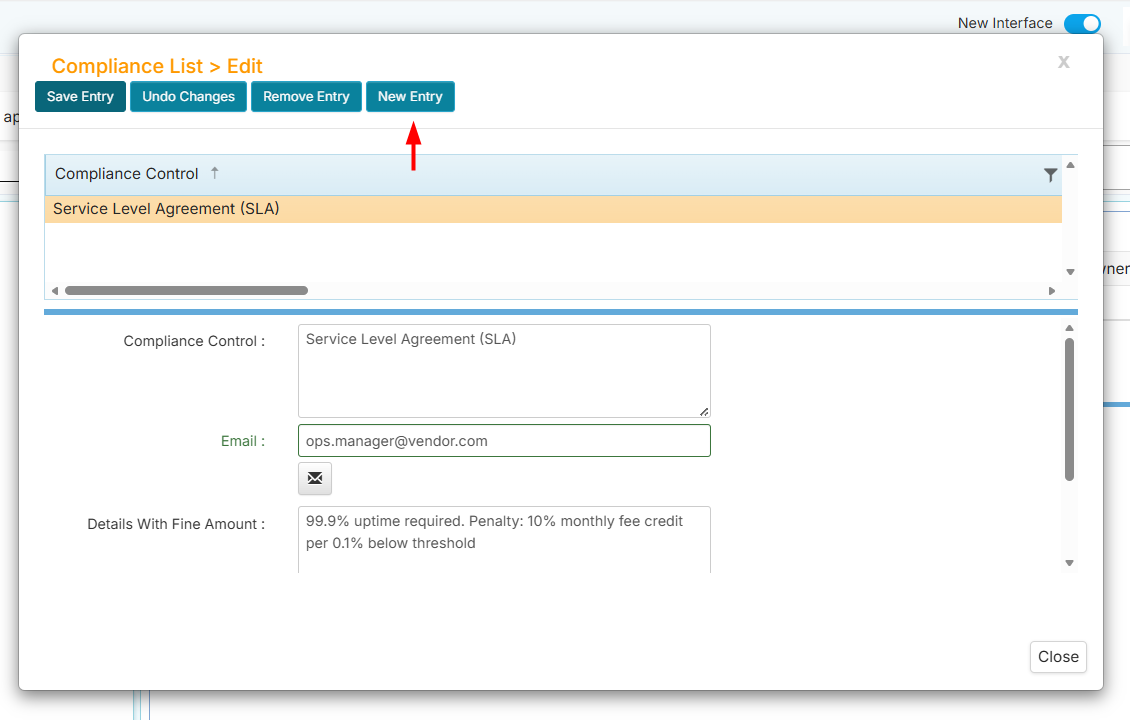
You should see multiple rows of entries in the Recurring Entries window like shown below:
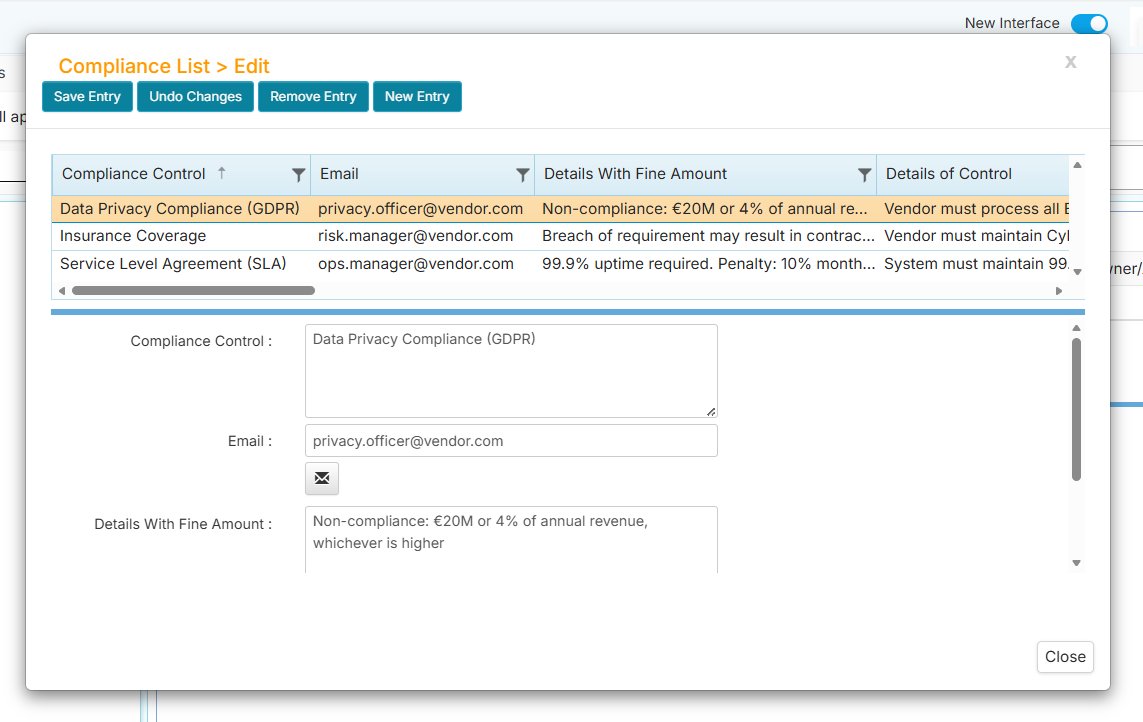
-
Close the window when you are done.
How to Reposition Fields
If you wish to change the position of fields or tabs, just drag and drop them into a new location. Their new position affects how they will be displayed in the form.
How to Unpin Fields
Pinned fields are those fields that are placed outside of any tabs. If you wish to unpin them and place them inside a tab, just drag and drop them.
-
Click Template Setup, then click Define Fields.
-
From the Workflows listing, find and click your assigned workflow.
-
On the Define Fields page, click the pinned field you wish to move.
-
Drag and drop it inside a tab.
-
Click the Save button.
How to Reposition a Field Within a Tab
You can change the position of fields within a tab by dragging and dropping them into a new location.
-
Click Template Setup, then click Define Fields.
-
From the Workflows listing, find and click your assigned workflow.
-
On the Define Fields page, find the tab where you wish to reposition a field.
-
Drag and drop the field before or after another field.
-
Click the Save button.
How to Reposition Tabs
If you wish to reposition the tabs, you may need to collapse all tabs first to make it easier to change their location.
-
Click Template Setup, then click Define Fields.
-
From the Workflows listing, find and click your assigned workflow.
-
On the Define Fields page, click the Collapse All button.
-
Click the tab that you wish to reposition.
-
Drag and drop the tab before or after the other tabs.
-
Click the Save button.
Define Headers
The Define Headers menu allows you to customize the display order of fields in record listing and email notifications.
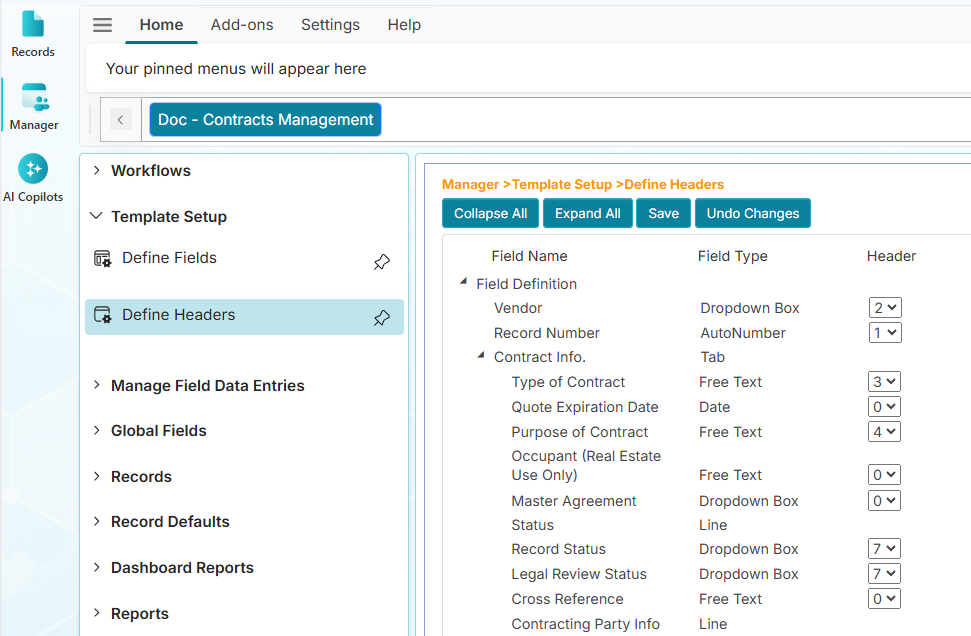
On the Define Headers page, you will see the list of fields and their types along with the configuration options: Header, Email Notification, Pending Requests, and Pending Signatures.
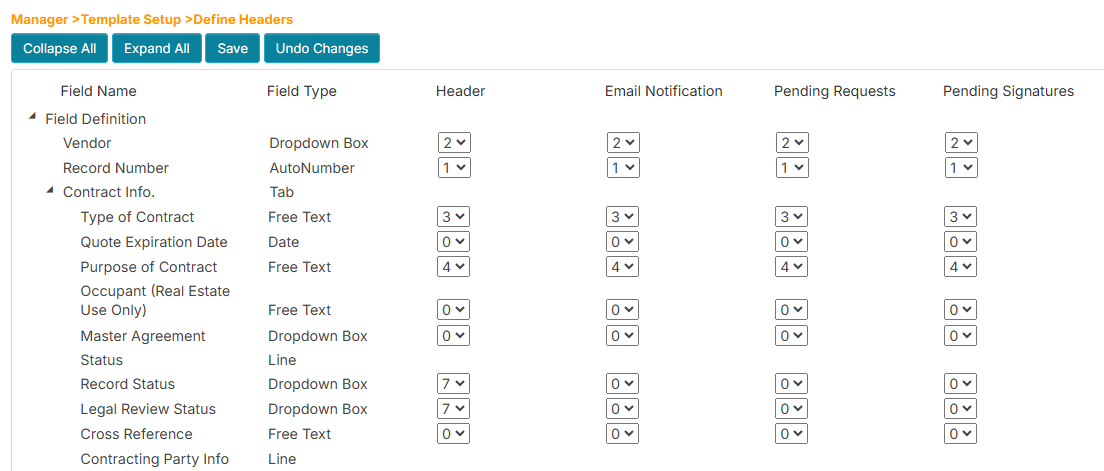
| Column | Description |
|---|---|
| Header (Record Listing) | The fields to be displayed in the record listing |
| Email Notification | The fields to be included in email notifications |
| Pending Requests | The fields to be displayed in the Pending Actions and Routing Report pages |
| Pending Signatures | The fields to be displayed in the Pending Signatures page |
For Date (Notify) or Tickler fields, you can specify which related fields to include in the email notification. For example, if you have an Expiration Date tickler field, you can include an Expiration Message field in the notification.
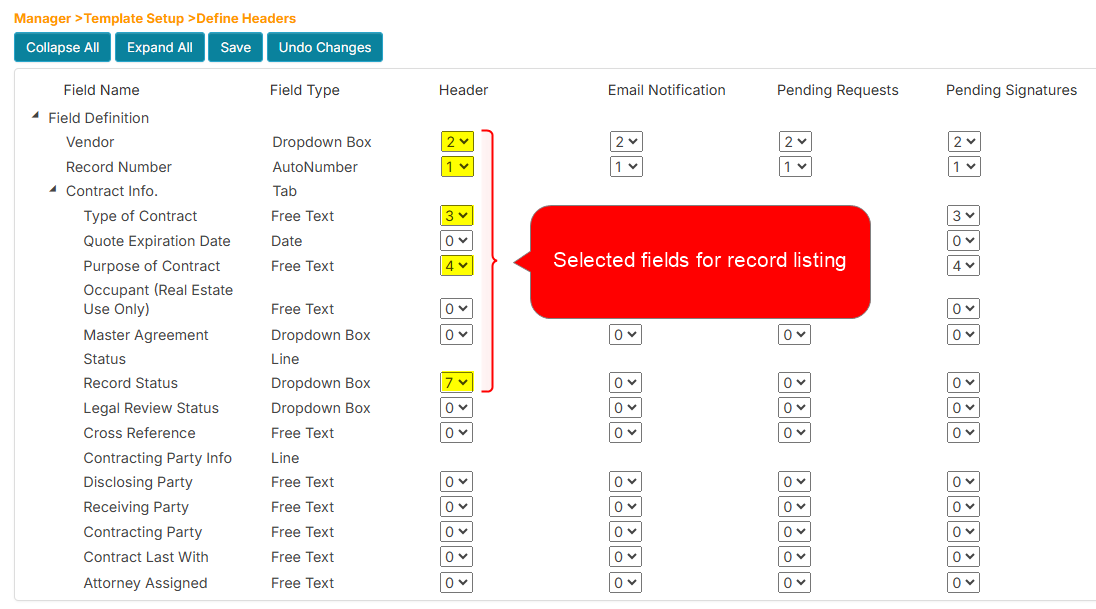
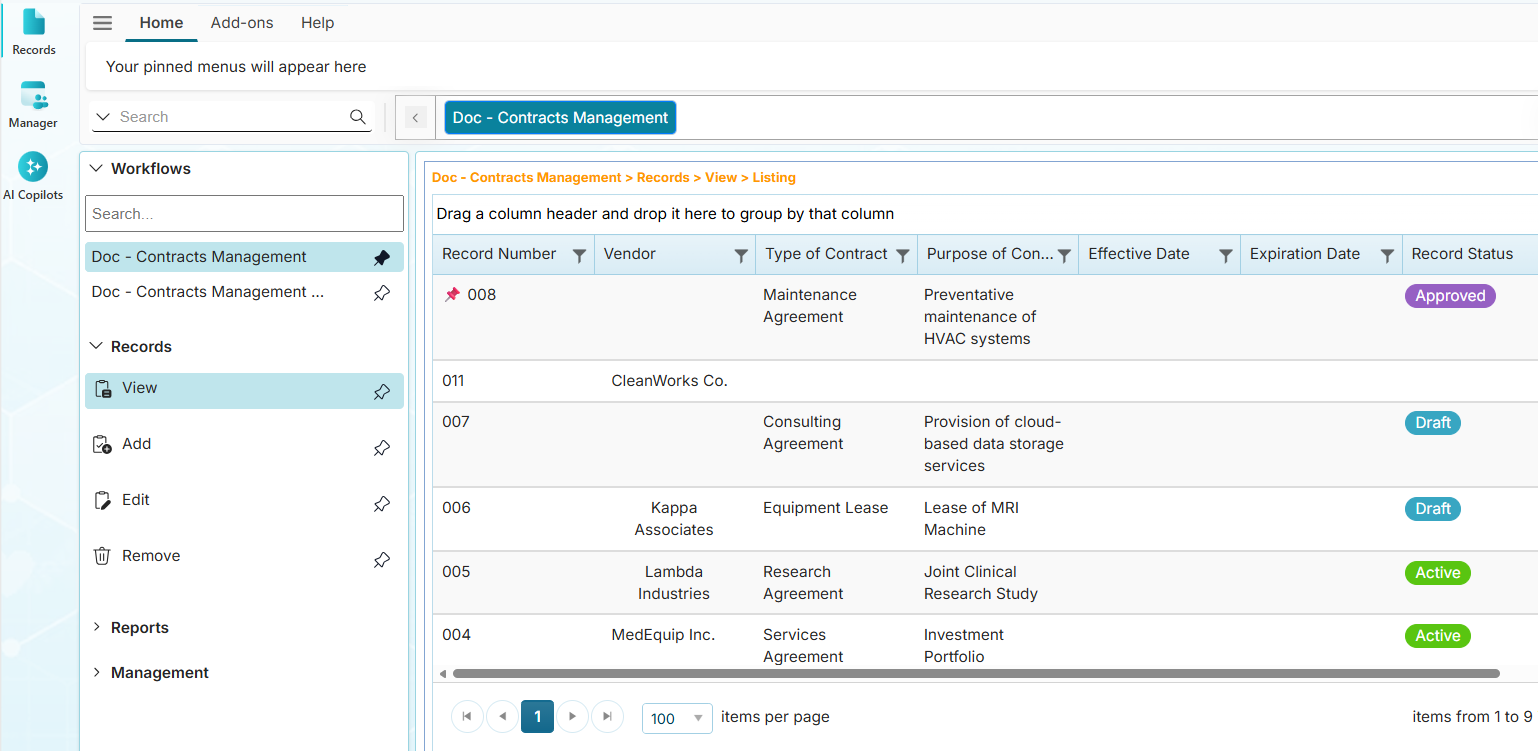
How to Configure the Record Listing Fields
- Click Template Setup, then click Define Headers.
- From the Workflows listing, find and click your assigned workflow.
- In the Header column, select the dropdown for the field you wish to include.
- Choose a number between 1 and 9. This number determines the order of appearance of the field in the record listing. Choosing 0 will exclude the field.
- Click Save when done.
- Click the Records tab.
- From the Workflows listing, select the workflow.
- Click Records > View or Edit menu, the chosen fields will be displayed in the record listing.
Example: The Define Headers page with selected fields for record listing.
The record listing displaying the selected fields.
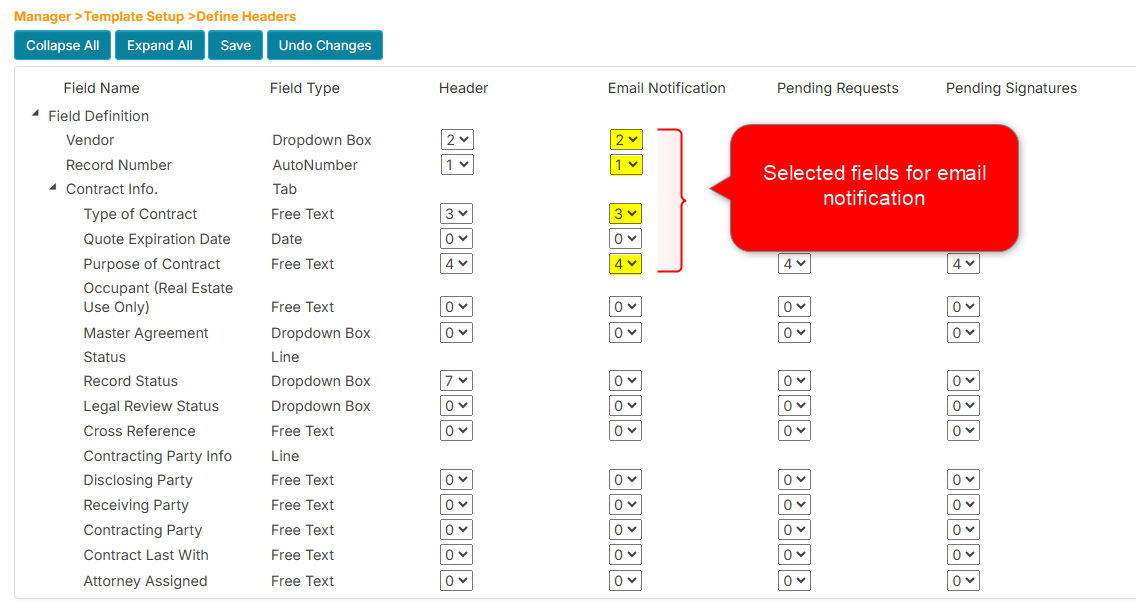
How to Configure the Email Notification Fields
- Click Template Setup, then click Define Headers.
- From the Workflows listing, find and click your assigned workflow.
- In the Email Notification column, select the dropdown for the field you wish to include.
- Choose a number between 1 and 9. This number determines the order of appearance of the field in the email notification. Choosing 0 will exclude the field.
- Click Save when done.
Example: The Define Headers page with selected fields for email notification.
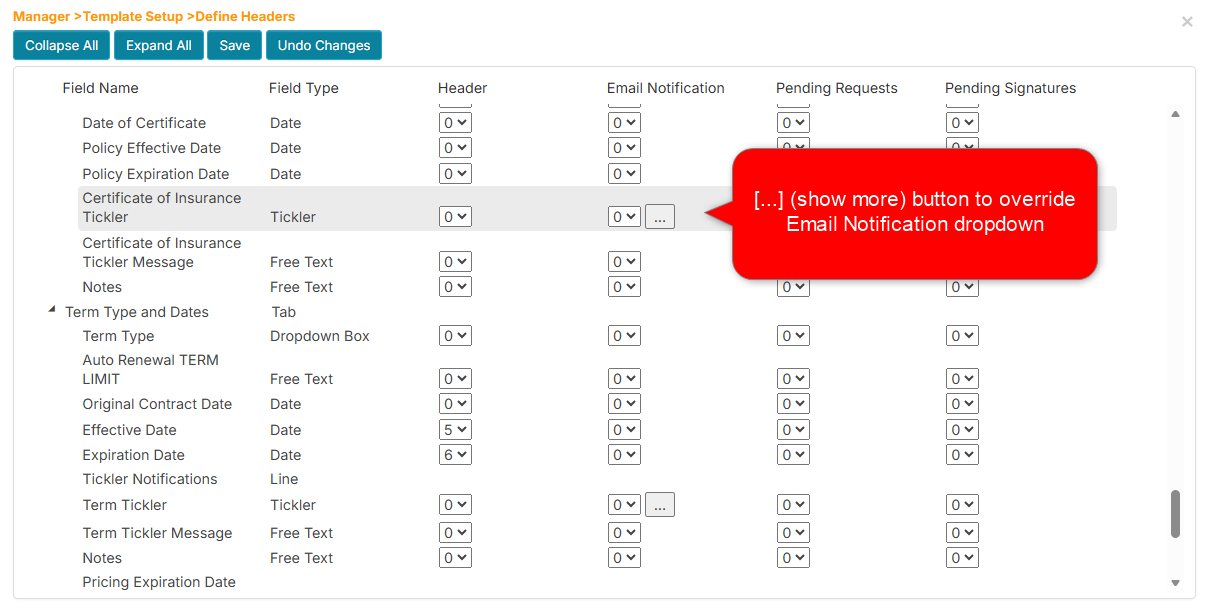
- For Tickler or Date (Notify) fields, a […] (show more) button will appear, allowing you to select additionals fields to include in the email notificaiton.
- If the dropdown is set to zero and there are fields selected using the show more option, those selected fields will override the Email Notification dropdown settings.
How to Override Email Notification Fields
The application allows you to specify a custom set of fields to include in the email notification when a Tickler or Date Notify field triggers an email.
- Click Template Setup, then click Define Headers.
- From the Workflows listing, find and click your assigned workflow.
- In the Email Notification column, select the dropdown for the Tickler or Date (Notify) field.
- Set the dropdown value to 0 to enable field override.
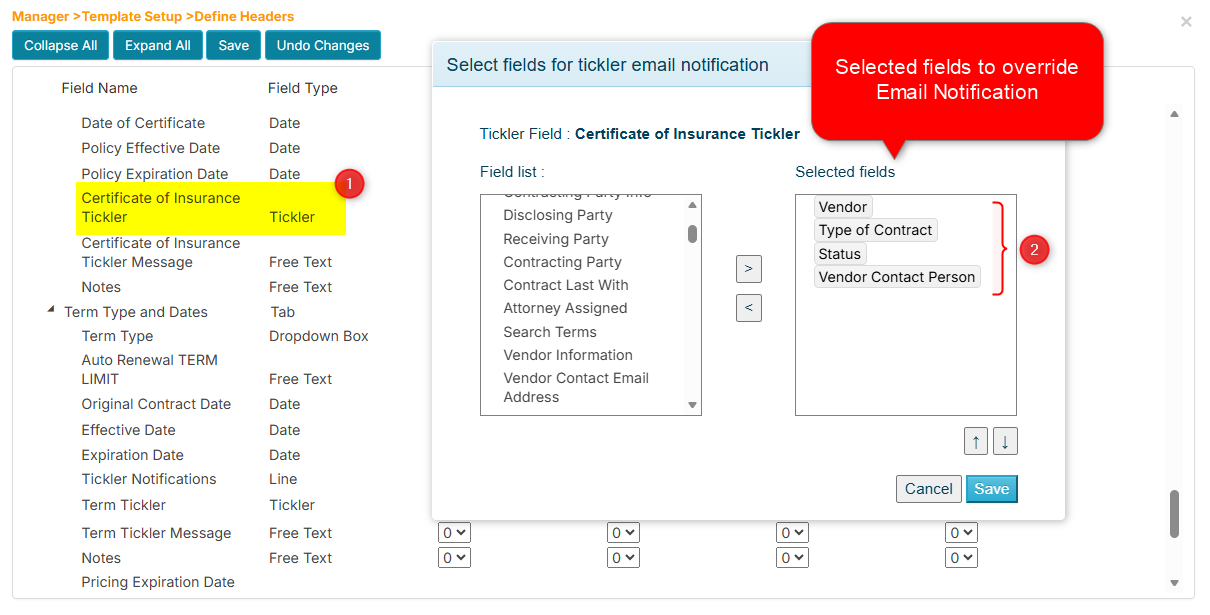
- Click the [...] (show more) button.
- In the popup window, select a field from the available list and click the right arrow button to add it to the selected fields.
- Repeat step 6 for all fields you want to include.
- Click the Save button when done.
Example: The Define Headers page with show more button to override email notification.
The Define Headers page popup window.
How to Configure the Pending Actions Fields (Routing)
- Click Template Setup, then click Define Headers.
- From the Workflows listing, find and click your assigned workflow.
- In the Pending Requests column, select the dropdown for the field you wish to include.
- Choose a number between 1 and 9. This number determines the order of appearance of the field in the Pending Actions page. Choosing 0 will exclude the field.
- Click the Save button when done.
Example: The Define Headers page with selected fields for display in the Pending Actions page.
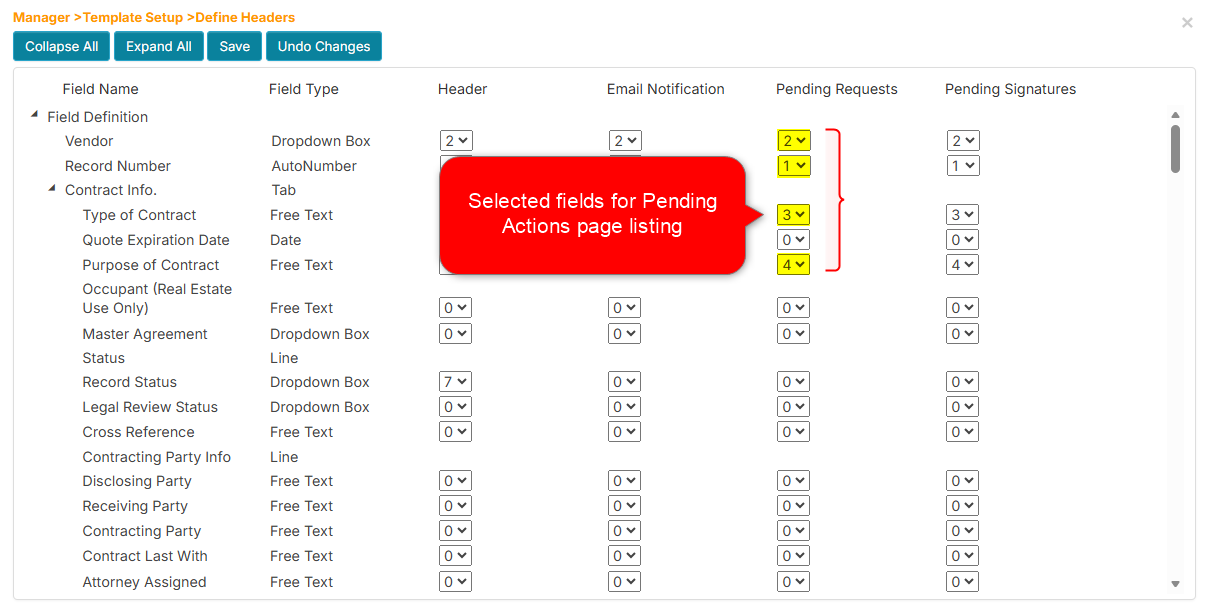
Configuring Pending Requests fields is required to properly display the Pending Actions page.
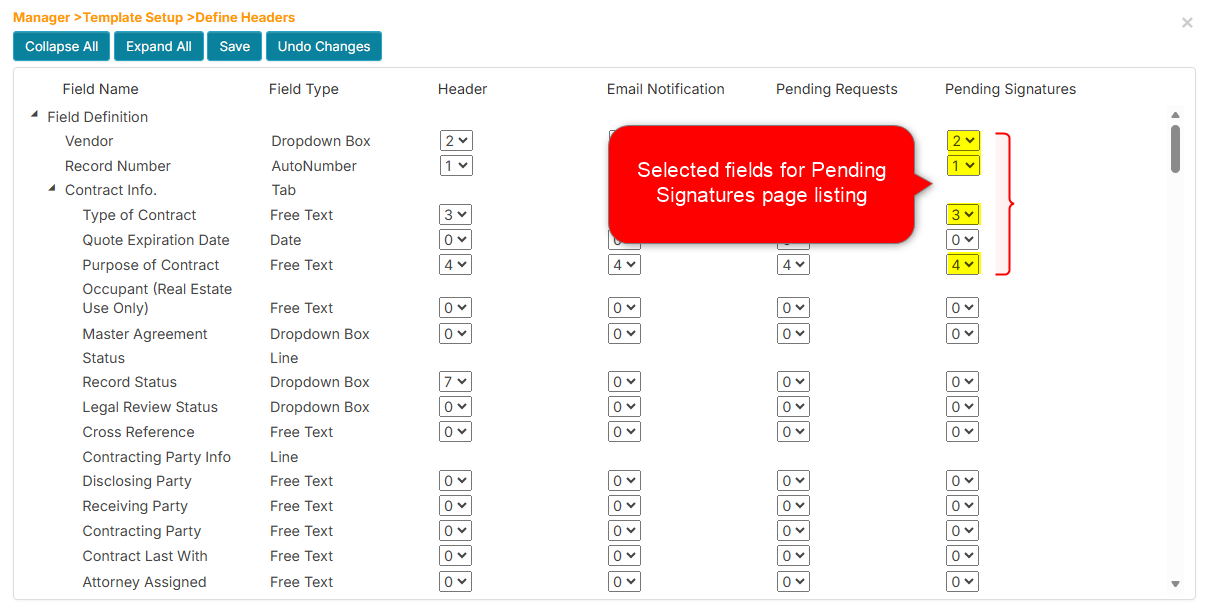
How to Configure the Pending Signatures Fields
- Click Template Setup, then click Define Headers.
- From the Workflows listing, find and click your assigned workflow.
- In the Pending Signatures column, select the dropdown for the field you wish to include.
- Choose a number between 1 and 9. This number determines the order of appearance of the field in the Pending Signatures page. Choosing 0 will exclude the field.
- Click the Save button when done.
Example: The Define Headers page with selected fields for display in the Pending Signatures page.
Configuring Pending Signatures fields is required to properly display the Pending Signatures page.